In this document page, I want to introduce the chatbot history panel in the KimaAI dashboard plugin.
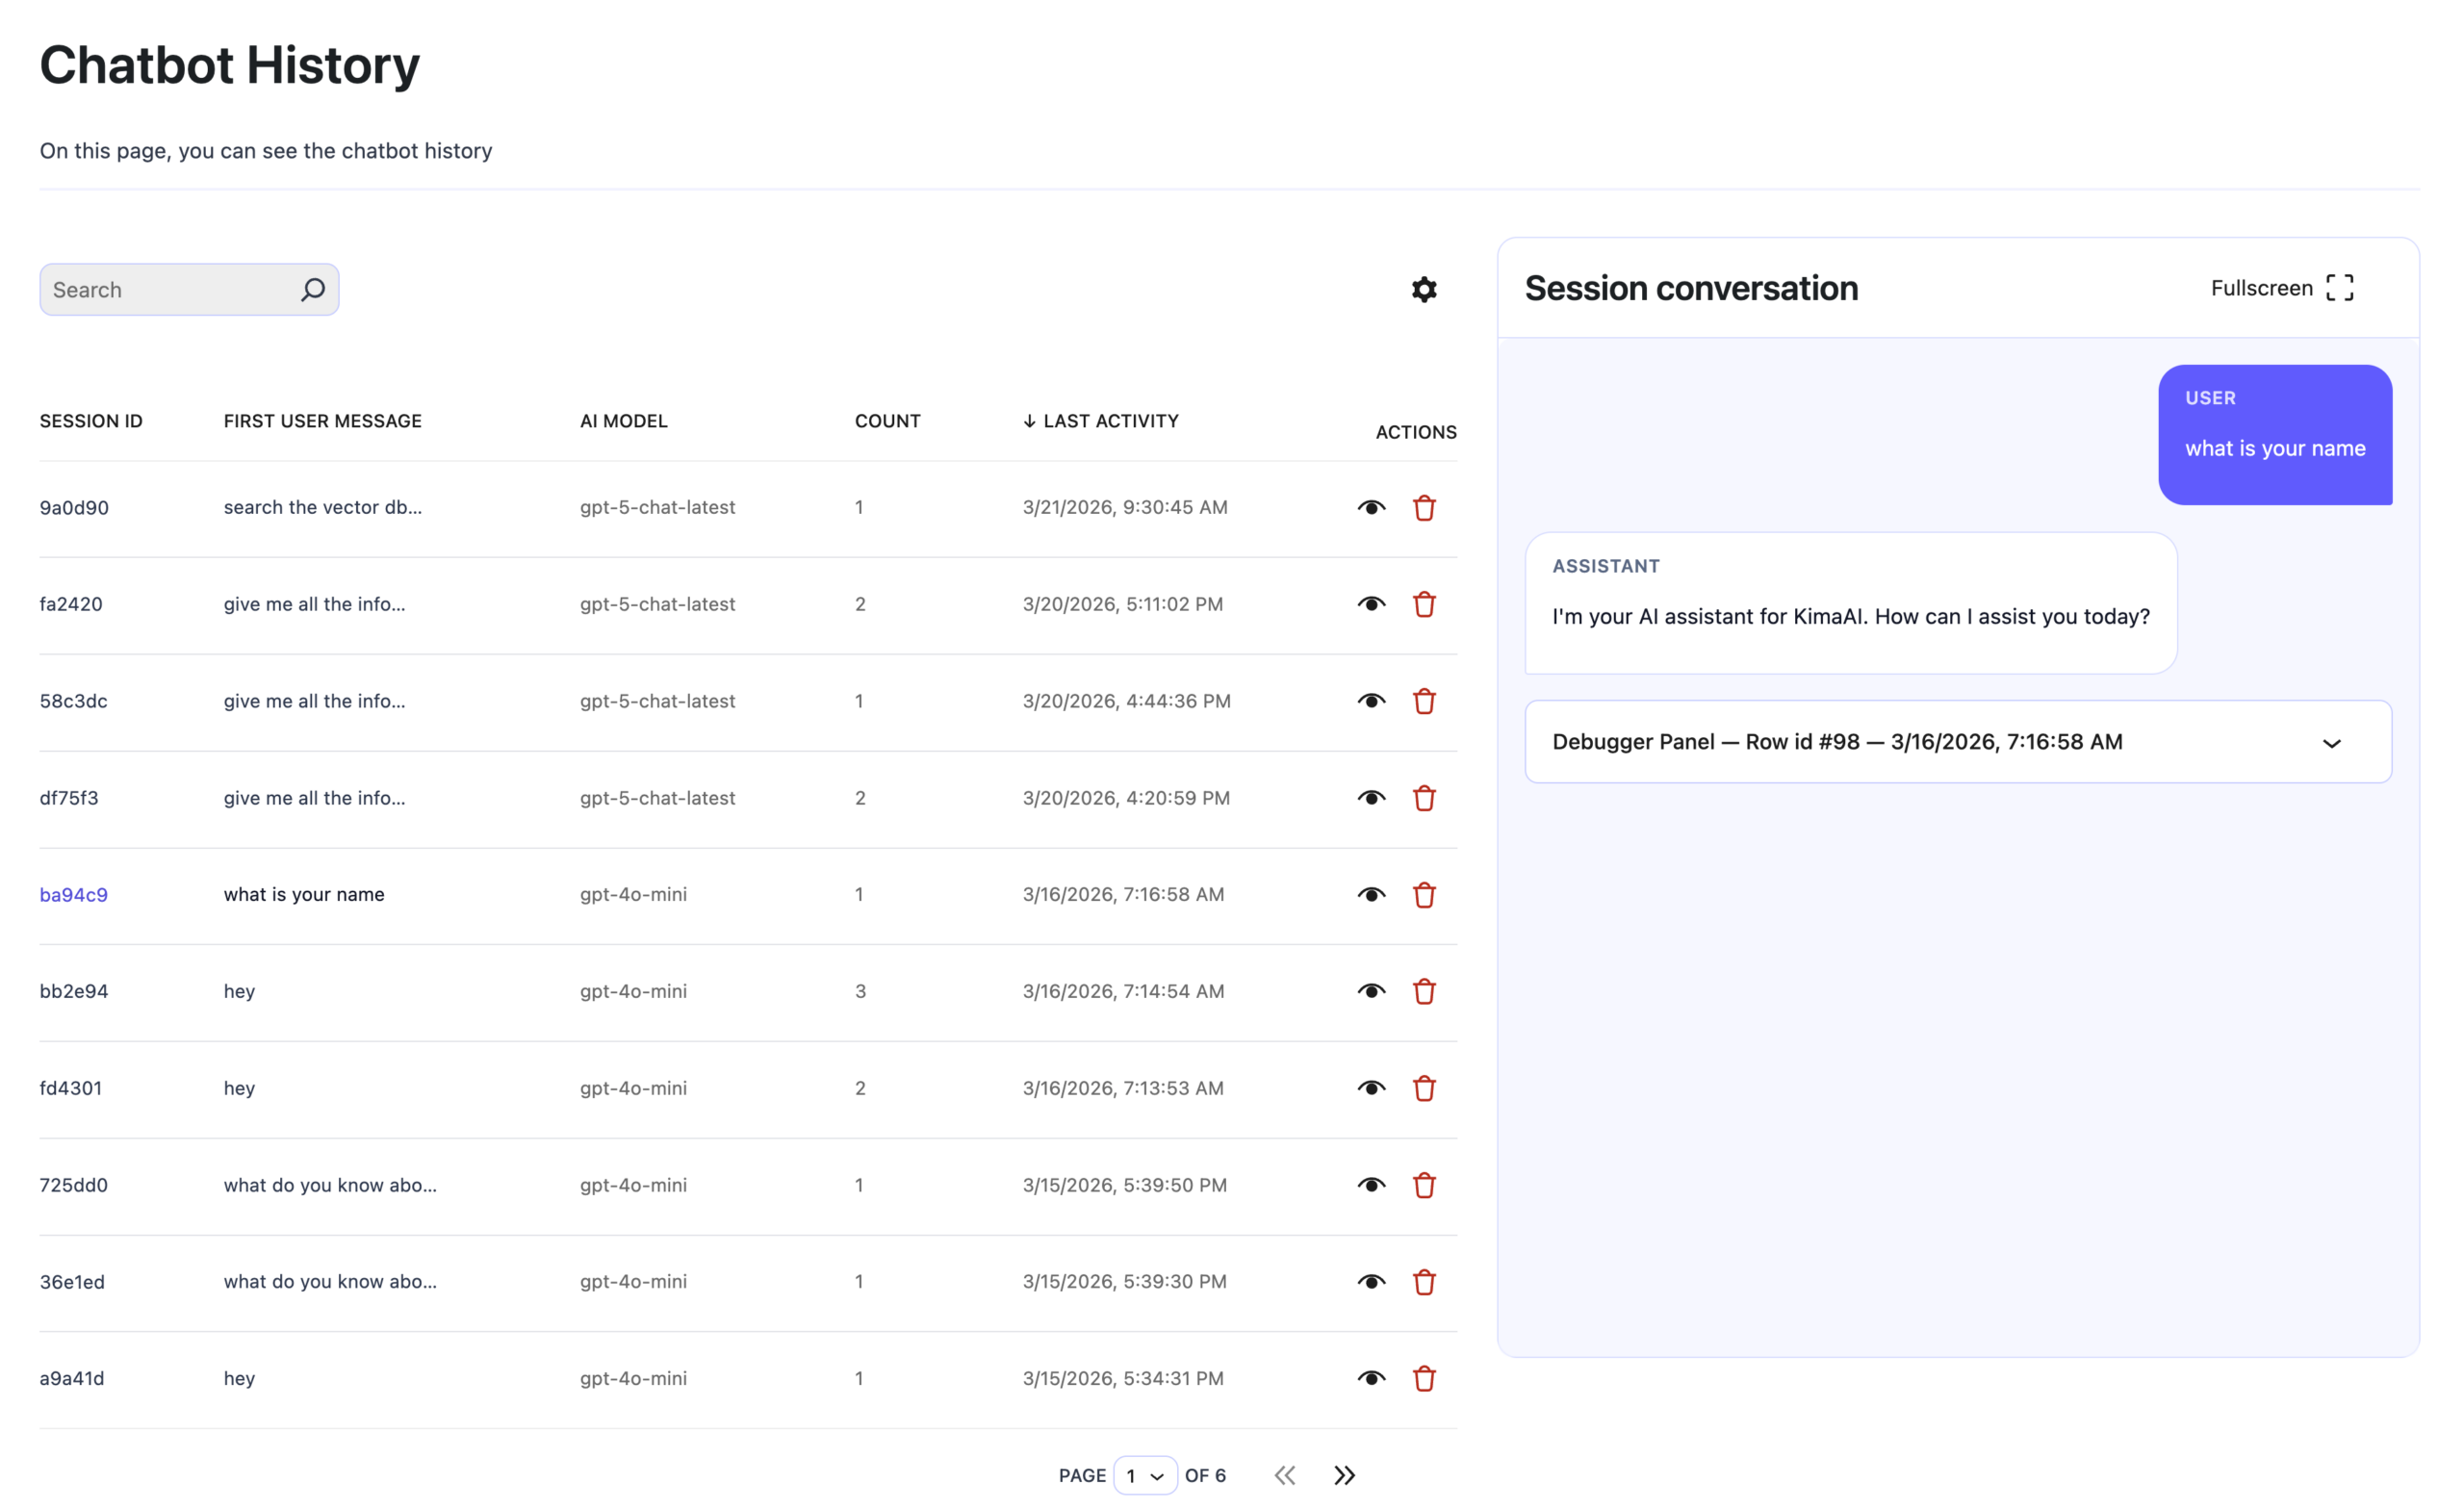
To open the Chatbot History, navigate to the WordPress dashboard → KimaAI settings page → Chatbot → History, After doing so, you should see the chatbot history panel like the following screenshot:
What can you do in the Chatbot History Panel?
Now that you know how to open the chatbot history panel, let’s see what you can do with it and why you want to check out this panel from time to time.
What the Chatbot History Panel does
At a high level, the Chatbot History Panel gives a website administrator a record of chatbot conversations and a way to inspect how the assistant behaved in each session. Instead of treating the chatbot as a black box, the panel exposes the session list, the conversation thread, and the technical trace information underlying the answer.
The page is split into two main working areas:
- a history table on the left, listing past sessions
- a session conversation viewer on the right, showing the selected conversation in detail
This makes the panel useful for both quick review and deep inspection. An admin can scan many chats at once, then open one session to see exactly what the user asked, how the assistant answered, and what happened behind the scenes.
What the panel contains
The session list includes these core fields:
- Session ID
- First user message
- AI model
- Count
- Last activity
- Actions
There is also a search box at the top, plus pagination at the bottom. In practice, this means an admin can quickly locate a conversation, identify which model handled it, see how active the session was, and jump into the full transcript.
The Actions column has the following:
- a view/open action
- a delete/trash action
That means the panel is not just passive reporting; it also gives admins direct control over stored conversation records.
Session conversation view
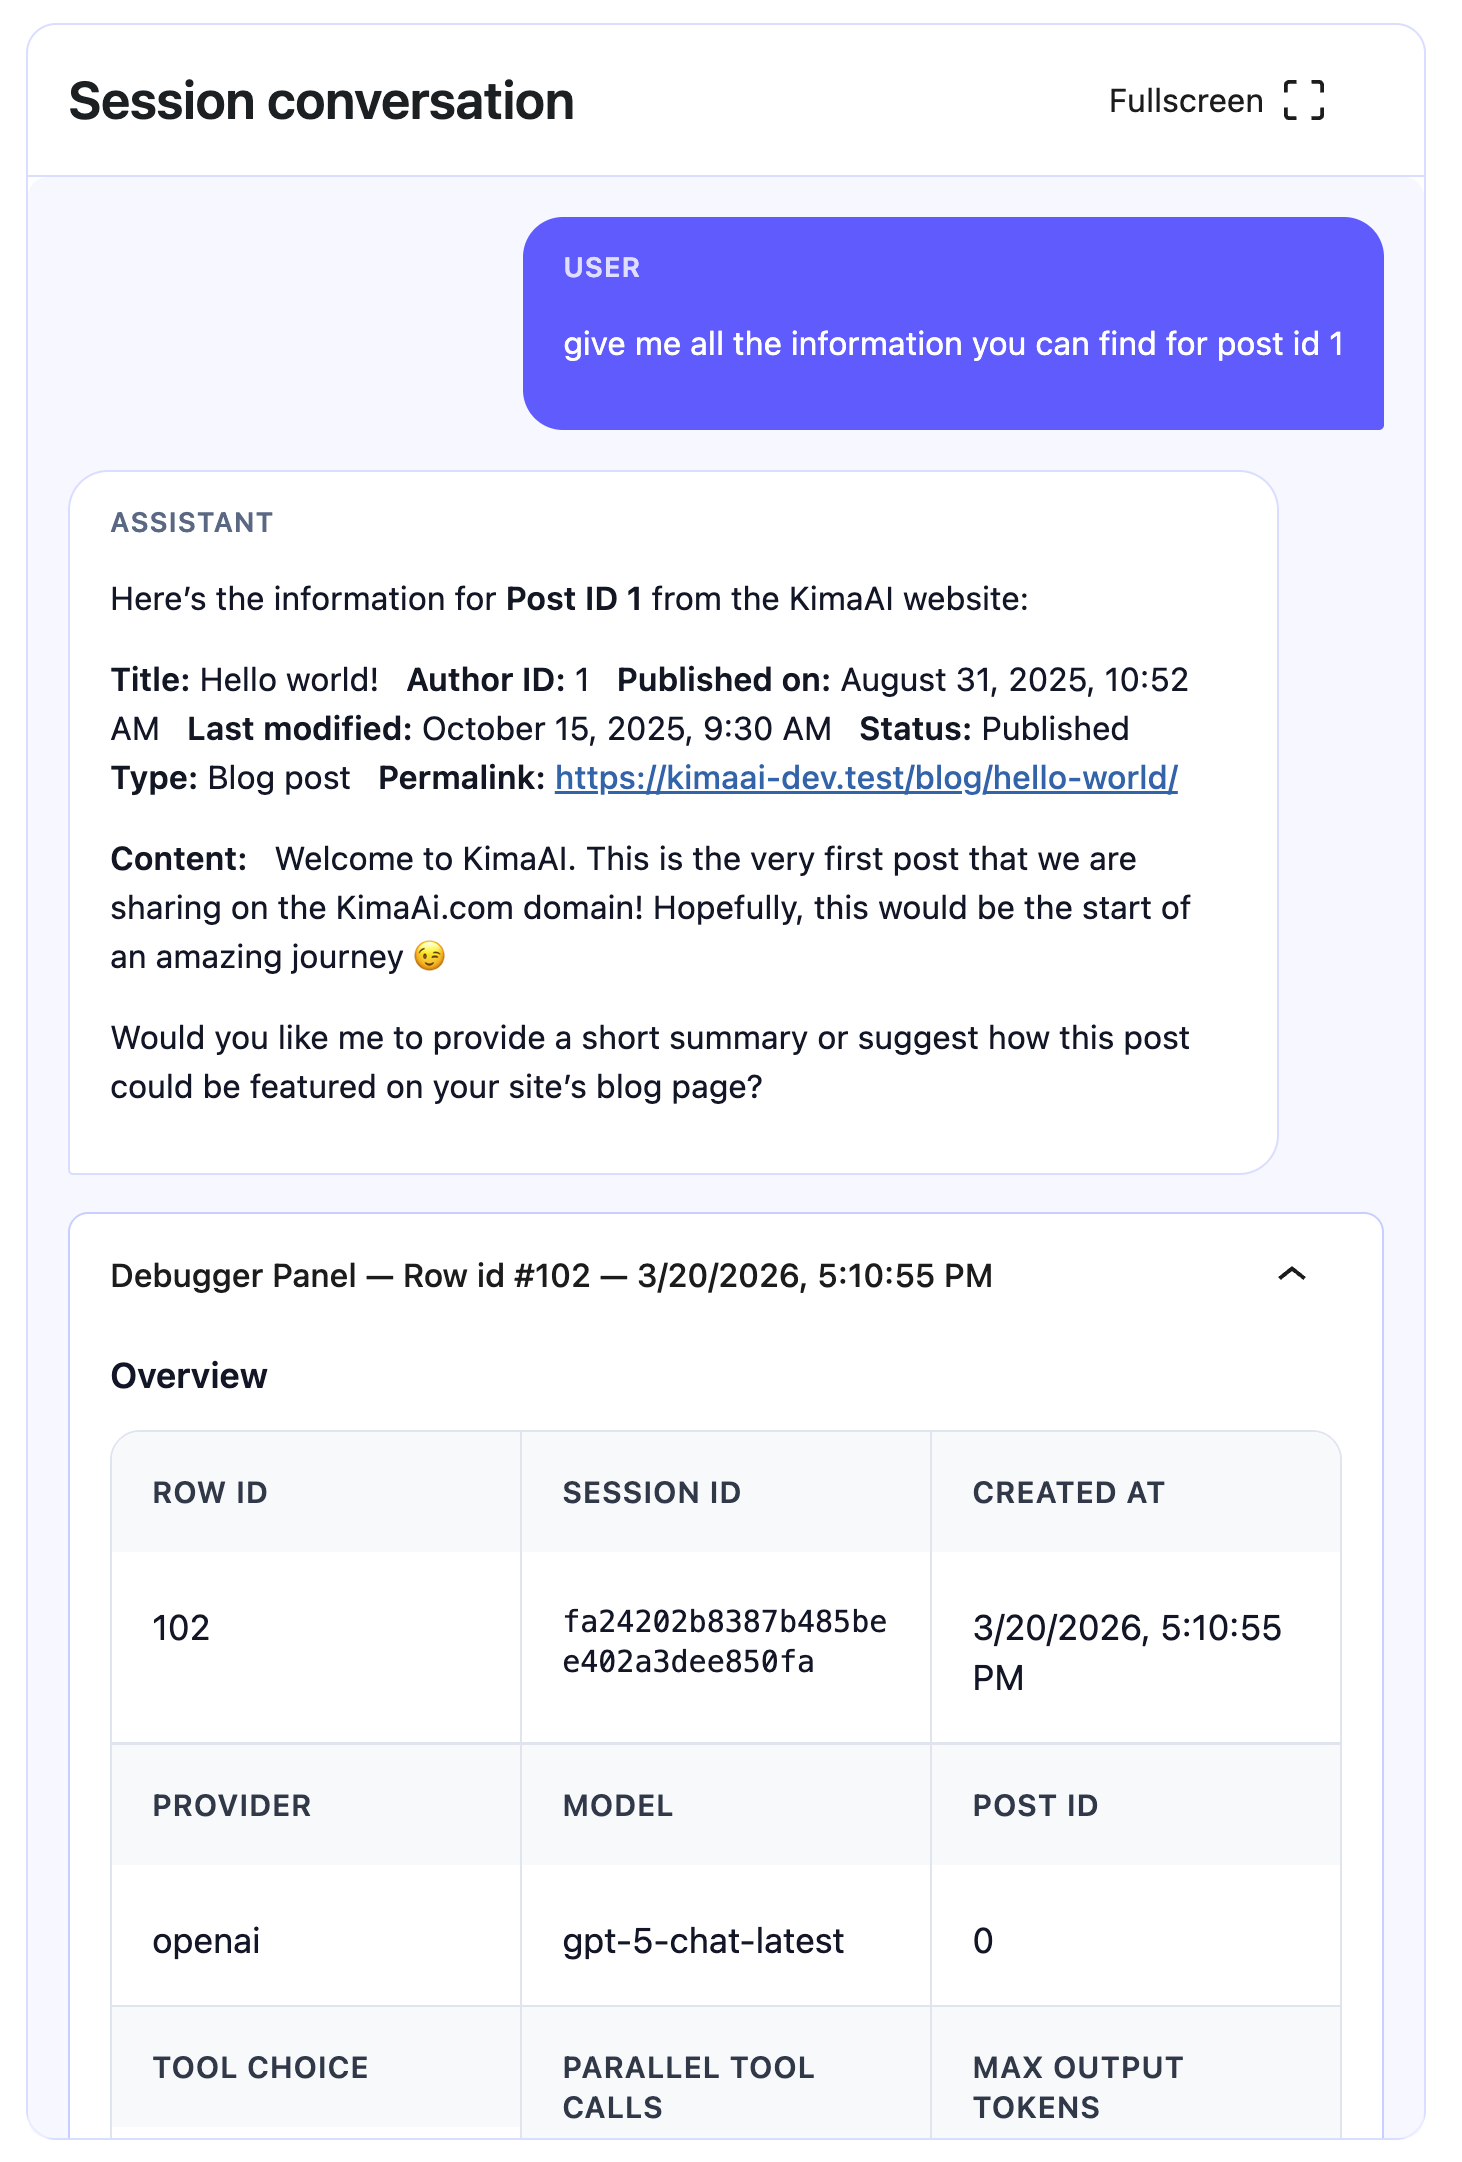
When a session is selected, the right-side panel shows the actual conversation between the user and the assistant. This is in a clean chat-style format, with a Fullscreen option for easier reading. This is useful when you need to review message wording, verify what the bot actually said to a visitor, or compare multiple messages within a longer exchange.
This view helps answer questions such as:
- What did the user actually ask?
- Did the assistant answer correctly?
- Was the reply too vague, too long, or off-topic?
- Did the chatbot use the expected tone and model?
- Did the session stay focused on the site’s content?
Reviewing real conversations is one of the best ways to assess whether the setup is working well in production.
The debugger panel: why it is there
The most important part of the chatbot history is the Debugger Panel, which appears beneath the conversation messages. This is where the Chatbot History Panel becomes more than a transcript viewer.
The debugger panel has:
- an Overview section
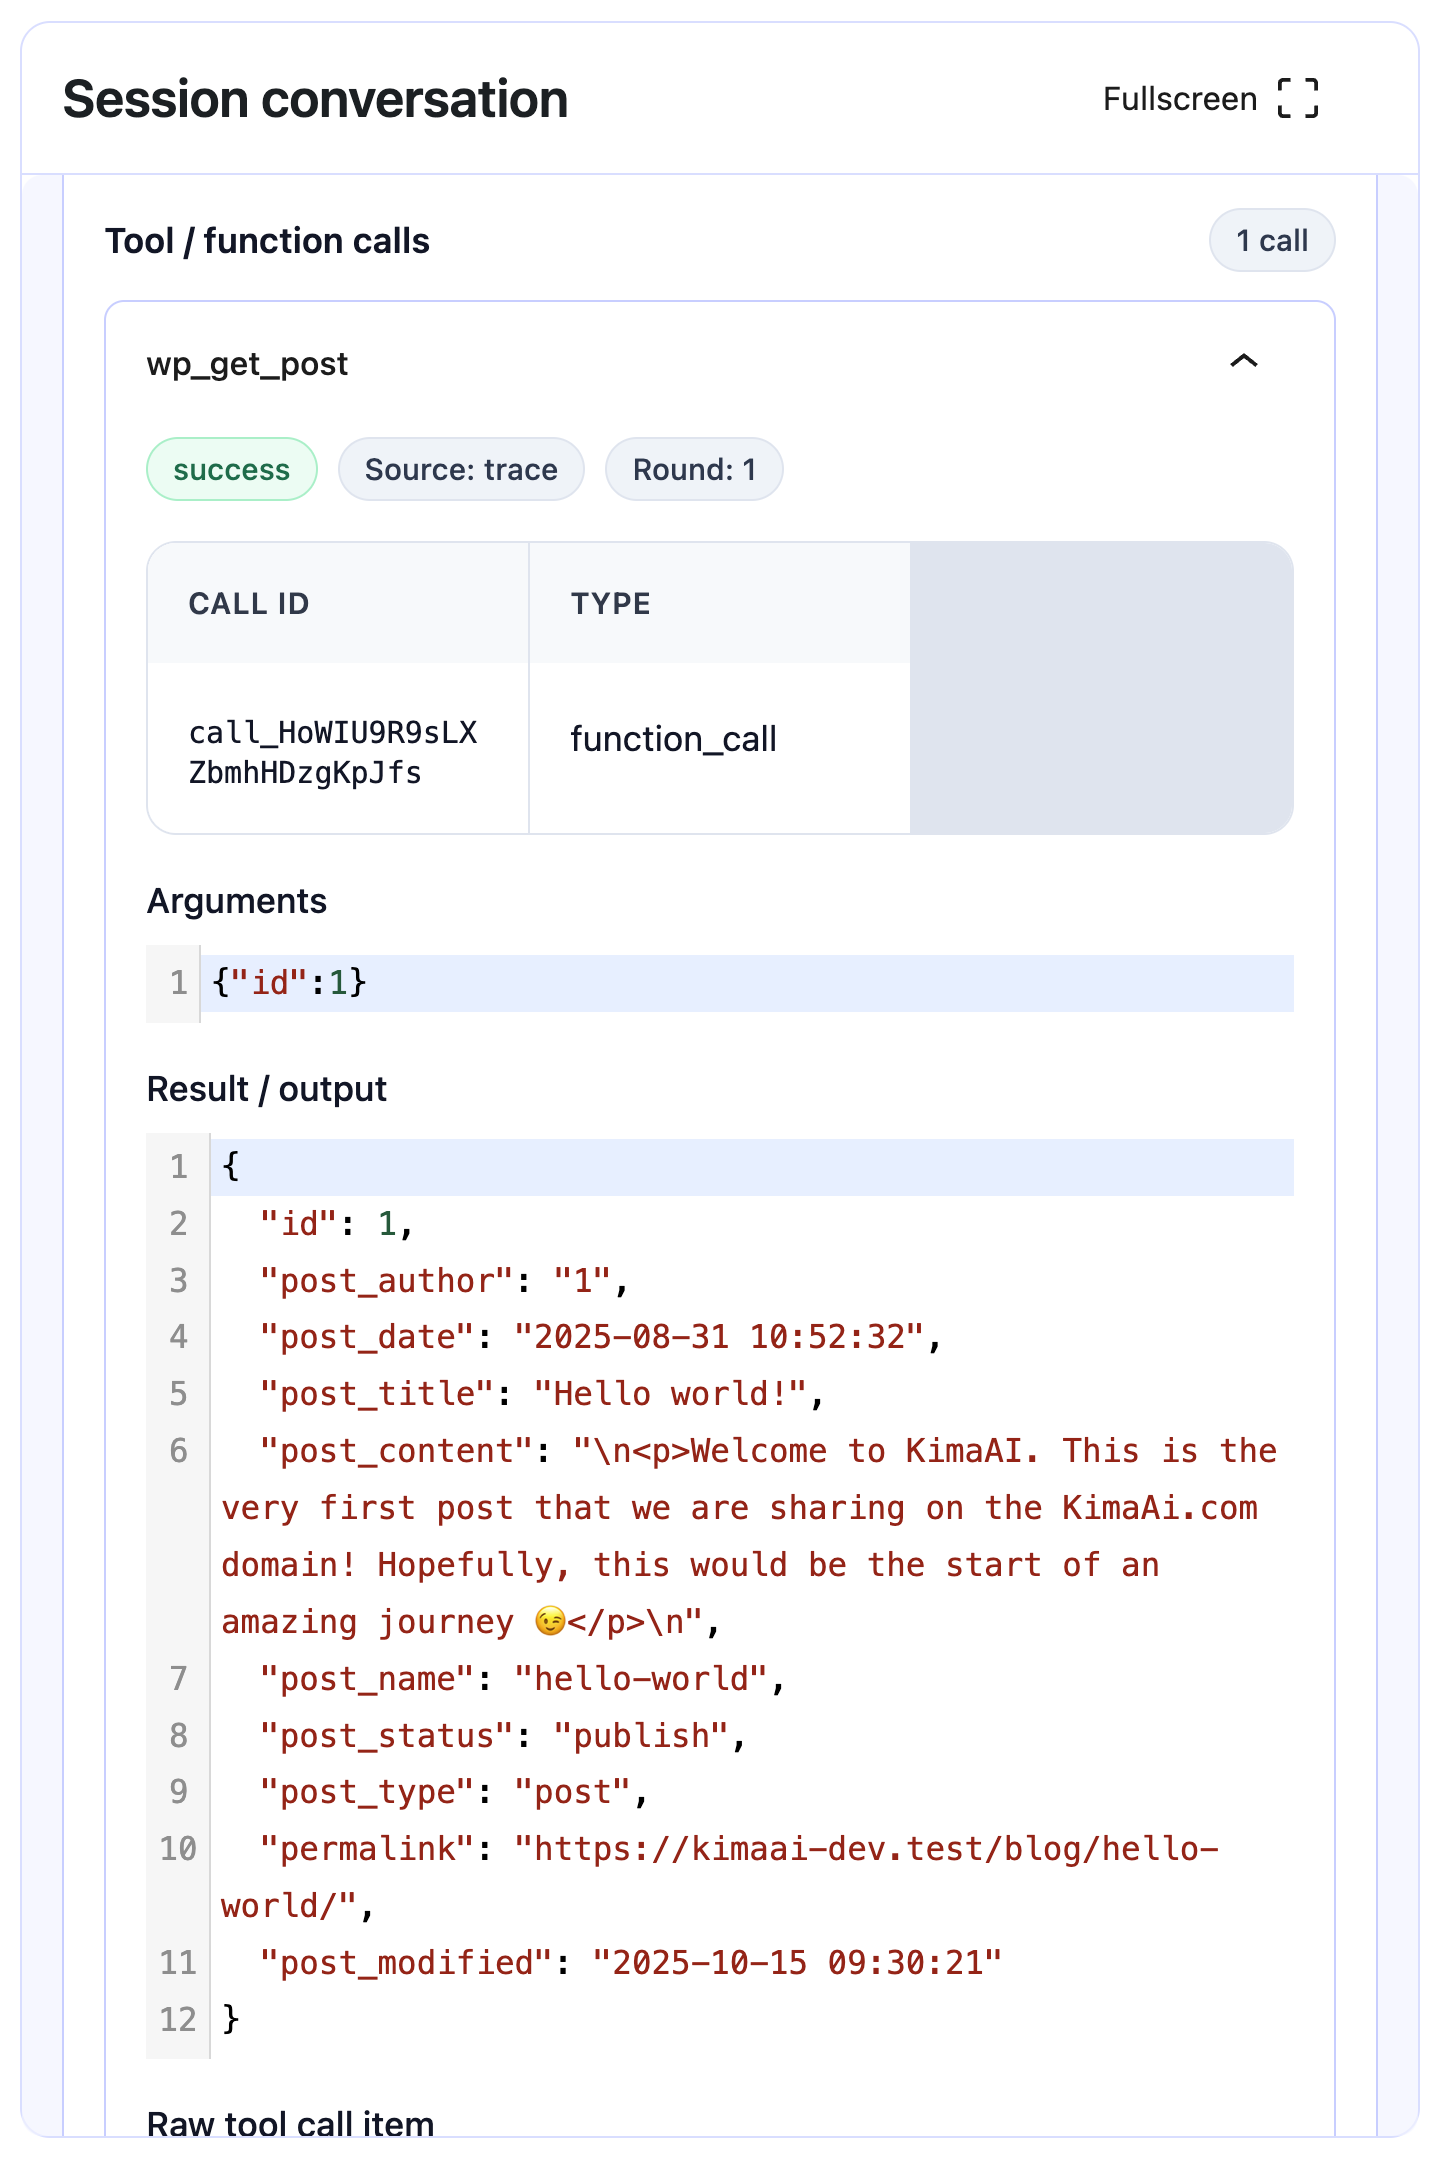
- tool / function call records
- error panel
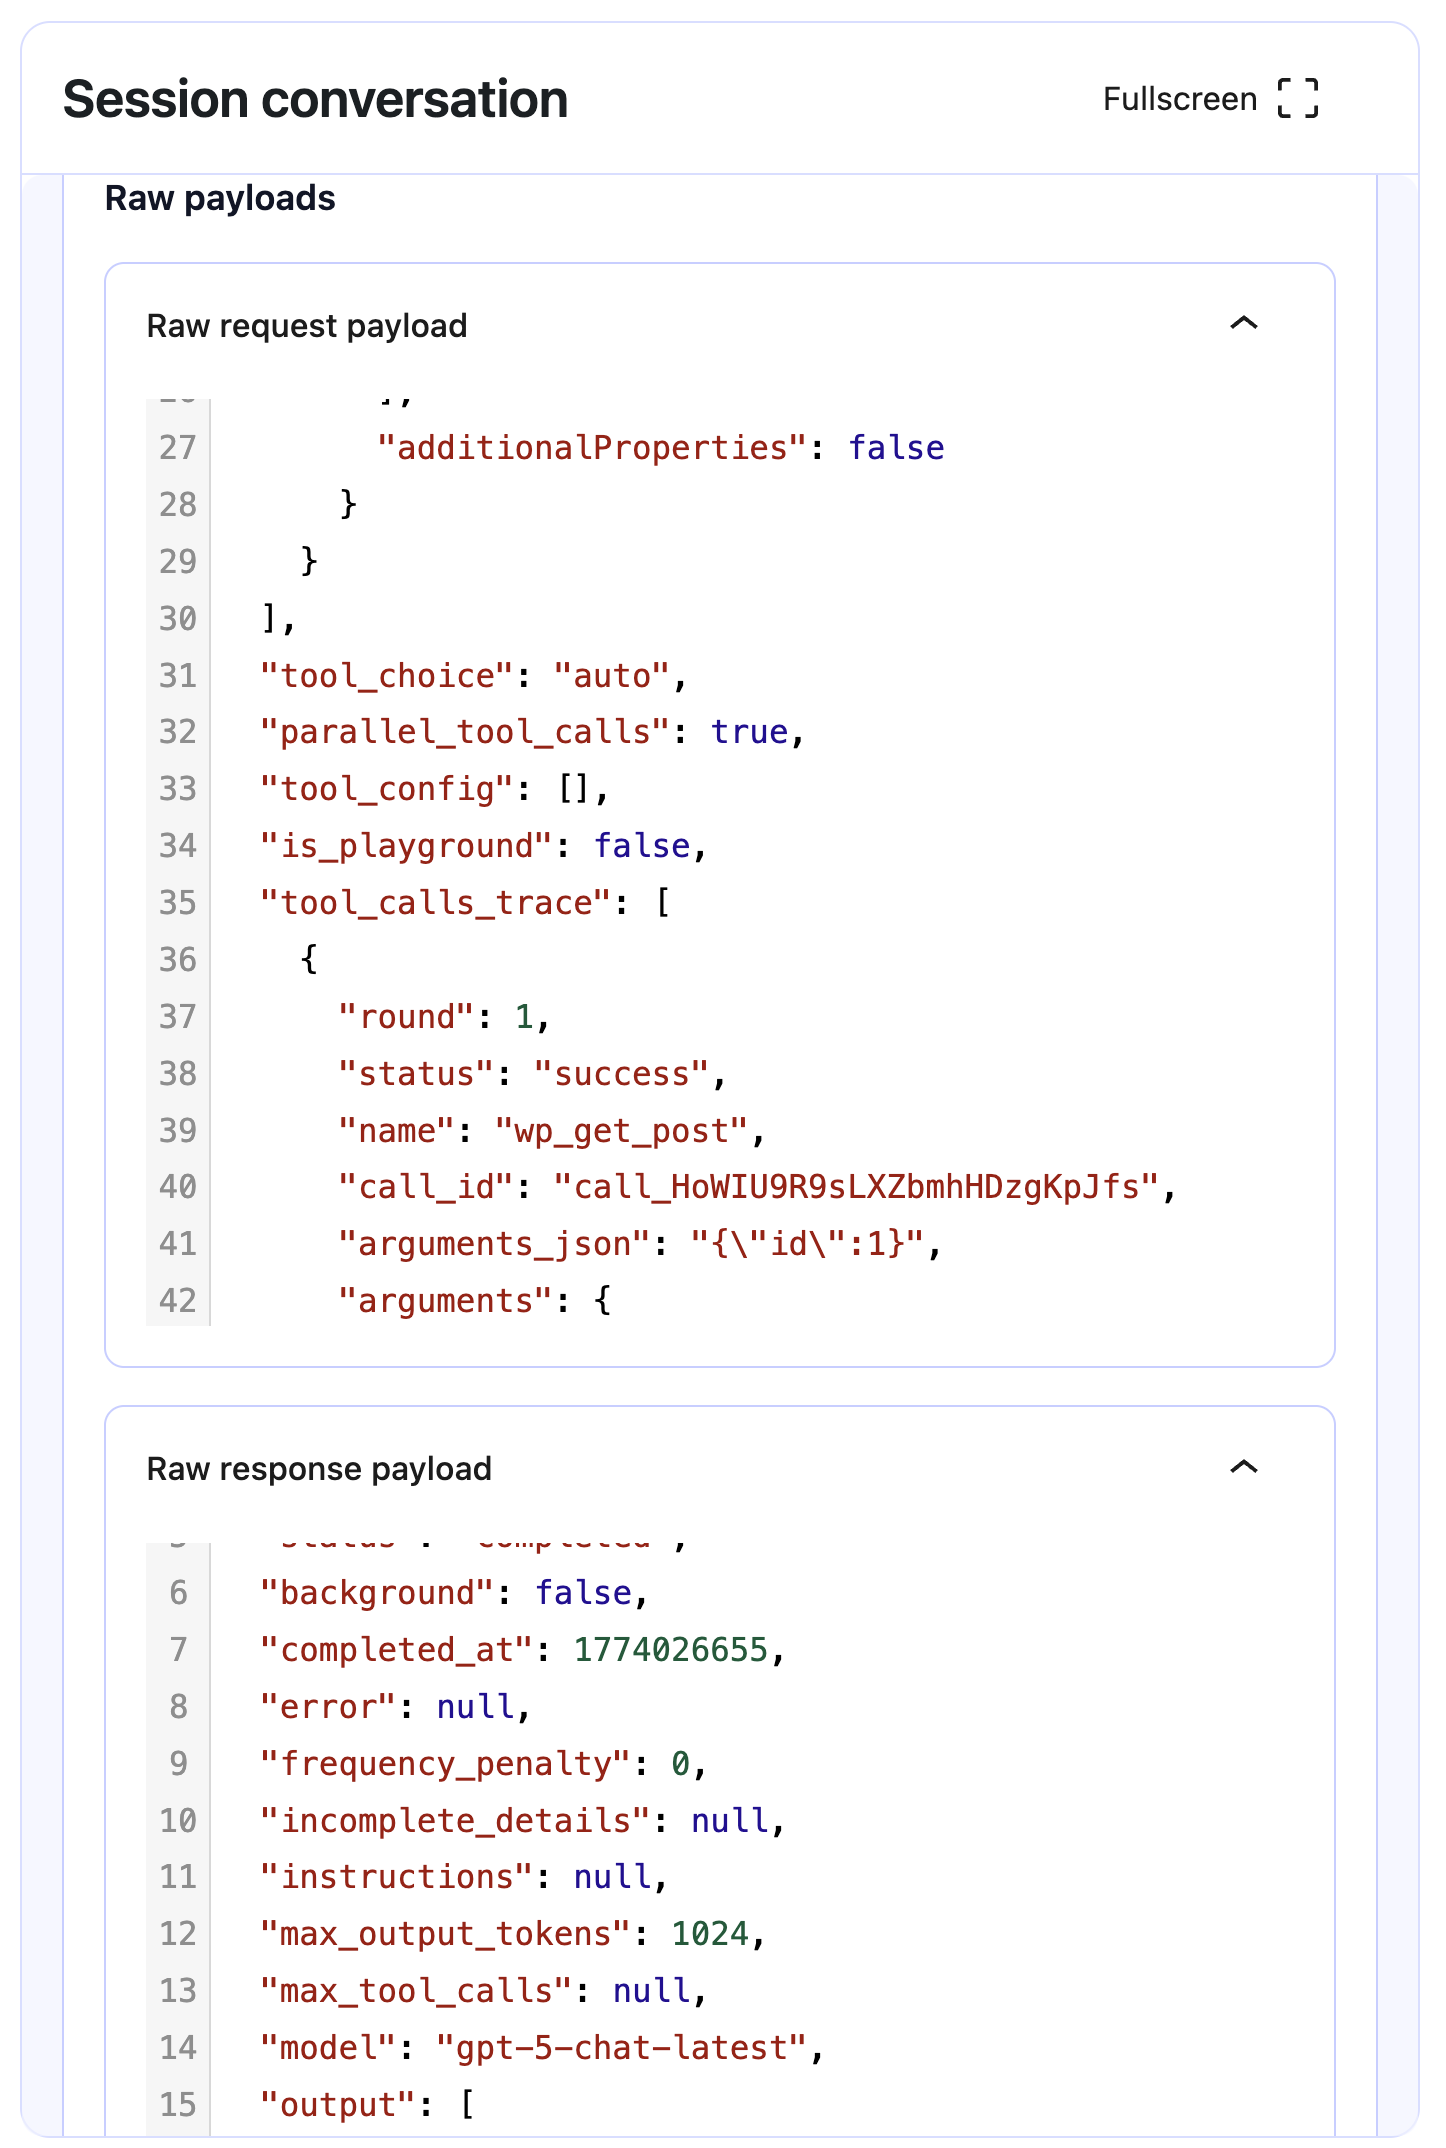
- raw request payload
- raw response payload
In the Overview section, the admin can see metadata such as:
- row ID
- session ID
- created at
- provider
- model
- post ID
- tool choice
- parallel tool calls
- max output tokens
- temperature
- response ID
- response status
- input tokens
- output tokens
- total tokens
This matters because it shows not only the conversation text, but also the technical context of the AI response. In other words, the history panel is doing three jobs at once:
- Conversation review
- Usage tracking
- Debugging and quality assurance
Why the panel contains raw payloads and tool calls
KimaAI supports Function or Tool Calling, which lets the model choose a tool, send structured arguments, let WordPress execute the tool, and then use the result to produce a better final answer. This is a built-in advanced feature, and KimaAI also provides hooks for registering and observing tool execution.
Thats why the Chatbot History contains items like:
wp_get_post- function arguments such as
{ "id": 1 } - tool output
- raw request and response payloads
Those details are there because an admin or developer may need to verify:
- whether the model decided to call a tool
- which tool it called
- what arguments were passed
- what output the tool returned
- how that tool result influenced the final assistant message
In our example, the chatbot responded to a user request for information about a post ID, and the debugger shows the wp_get_post function call and the returned post data. That is exactly the trace you would want when validating a custom tool or investigating whether a chatbot answer came from WordPress data rather than being guessed.
What you can do here
For a WordPress site administrator, the Chatbot History Panel is valuable because it makes chatbot management observable. You can use it to:
1. Review past chatbot conversations
You can reopen old sessions to review what users asked and how the bot responded. This is useful for support review, content QA, and prompt tuning.
2. Search and locate specific sessions
The search box and session list make it easier to find a conversation by session, message, or recent activity.
3. See which AI model handled each chat
The history table shows the model used for a session, which helps compare results between models or confirm that the correct model is active.
4. Inspect conversation volume
The count and last-activity fields help you identify active sessions, repeated questions, or conversations worth reviewing.
5. Open a conversation in detail or fullscreen
The conversation panel is built for readable inspection, especially when reviewing long exchanges.
6. Audit function and tool calls
If the chatbot uses custom WordPress tools or data-fetching functions, you can inspect which tool was called and whether it behaved correctly.
7. Check raw API request and response payloads
This is especially useful for developers, agencies, and advanced site owners. It helps diagnose prompt issues, malformed tool definitions, unexpected arguments, or response-shaping problems.
8. Monitor token usage and response metadata
Because the panel shows input, output, and total token counts, it can help admins understand cost patterns, verbosity, and response efficiency.
9. Validate response status and execution settings
Fields such as response status, max output tokens, tool choice, and parallel tool calls help verify how a request was configured and completed.
10. Delete conversation records
The delete icon in the session list suggests that admins can remove sessions they no longer want to keep.
Why this panel matters in real site operations
A chatbot on a live website should not be treated as “set it and forget it.” It needs review. The Chatbot History Panel lets admins measure whether the bot is actually useful to visitors.
For example, this panel can help answer operational questions like:
- Are visitors asking the same thing repeatedly?
- Is the chatbot failing on certain content types?
- Are custom tools returning the right data?
- Are responses getting too long or expensive?
- Is the bot using the expected model and provider?
- Are there bad sessions that should be reviewed before changing prompts or settings?
Because KimaAI is designed to support content-aware responses and advanced tool integration, the history screen becomes a key part of maintaining trust, accuracy, and performance.
The Chatbot History Panel in the KimaAI dashboard is the admin area where you can review saved chatbot sessions, inspect full conversations, monitor models and token usage, and debug function/tool calls through overview data and raw request/response payloads.


