One of the coolest KimaAI Chatbot features is the quick actions, which you can predefined them to speedup the user engagement with the AI Chatbot / AI Assistant.
Quick Actions Placement
You can place these quick action buttons in 2 different scenarios:
- Start of the chat
- This is when the conversation between the user and the chatbot has not yet started.
- You can use this type of quick action to present the user with predefined options, which usually makes users interact with the chatbot faster.
- After a bot message
- This is a more advanced quick action and needs more thinking, because you can show some quick action after a certain bot message.
- For example, you can configure the “Go To Contact Page” quick action to be shown after the chatbot response contains the “Contact us” query/keyword. You can do this via the “Keywords” field under the “Placement“.
Action Type
Currently there are the following action types that you can choose for each quick action buttons:
- Open a link
- Use this quick action type when you want to redirect the user to a specific link, it can be an internal or an external link.
- Send message immediately
- You can set this quick action to send a specific and ready message to the chatbot as soon as the user clicks on this quick action button.
- Use this action type to speedup the user engagement with the AI Chatbot.
- Pre-fill input
- This quick action can act like a template when the user clicks on it, a predefined message will be filled into the chatbot and ready for sending, but we will not send immediately, and will allow the user to edit it first before sending it to the AI.
- Run command
- If you want to run a command with a quick action button or force a tool, this is the action type that you should use.
Action Type Configuration
Just a heads up, based on the action type that you will choose, you will see different settings/fields to configure. So be aware that the configuration will be different based on the action type.
Quick Action Examples
Ok, now let’s create a few quick actions together to get to know this feature better.
Example 1: Open a link
This is how the chatbot will look after we create an “open a new link quick action“, as you can see in the following screenshot, here is configuration for such a quick action:
- Placement: Start of chat
- Button Label: Go To Contact Form
- Action Type: Open a link
- URL To Open: Your desired URL, like:
https://kimaai.com/contact
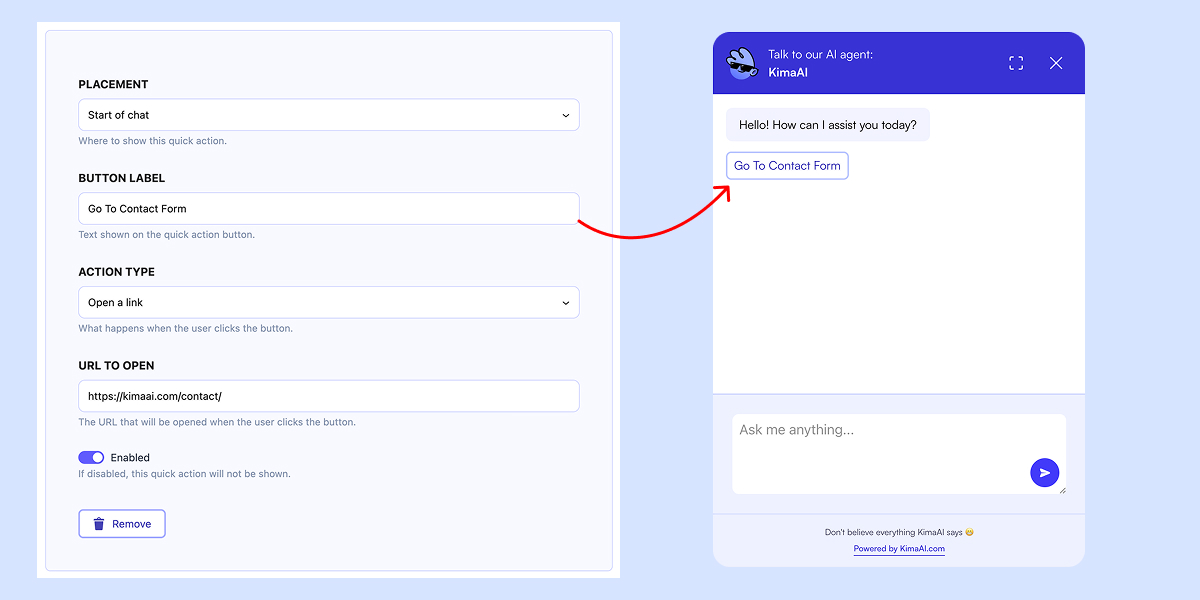
The Quick Action Expected Behavior
We expect that if the user clicks on this quick action button, they will be redirected to the desired URL in a new browser tab.
Example 2: Show a quick action after a bot message
If you want to show a quick action after the user did some back and forward conversation with the AI Chatbot / AI Assistant, you should set the quick action placement to “After bot message“.
In the screenshot, you can see that after the chatbot message contains our defined keyword “blue”, the chatbot shows the quick action that we set.
- Placement: After a bot message
- Keywords (Optional): blue, black
- Button Label: Go To Blue Link 😃
- Action Type: Open a link
- URL To Open: Your desired URL
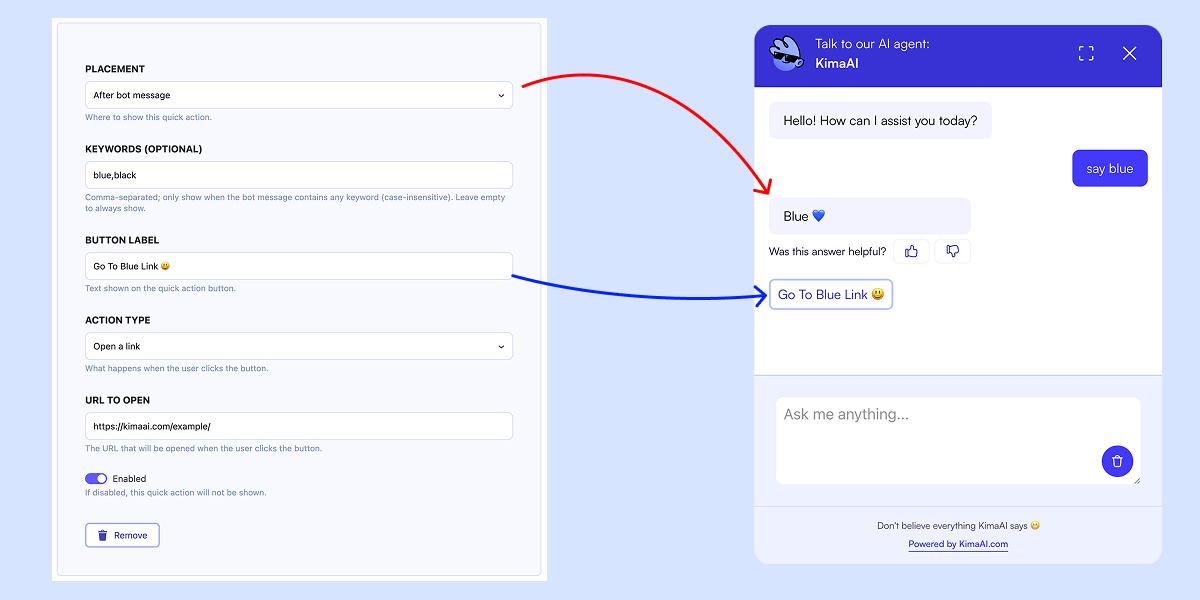
The Quick Action Expected Behavior
We expect that whenever the chatbot message contains our keyword, the defined quick action must be shown. In the above example, whenever the chatbot message contains “blue”, the quick action will be shown, regardless of the number of chats or the order.
Note: You can definitely create all types of quick actions and place them after a bot message. Another example can be, when the chatbot message contains "track your package" then we can set a quick action with type "Run command" and connect it to a tool or a callback function.
Example 3: Send Message Immediately
In this example, we want to configure a quick action to allow the user to use the chatbot as fast and as easily as possible, for that, we choose the “Send message immediately” action type with the following settings:
- Placement: Start of chat
- Button Label: I Need Support
- Action Type: Send message immediately
- Message: I need support. How can I send a support ticket to the KimaAI team?
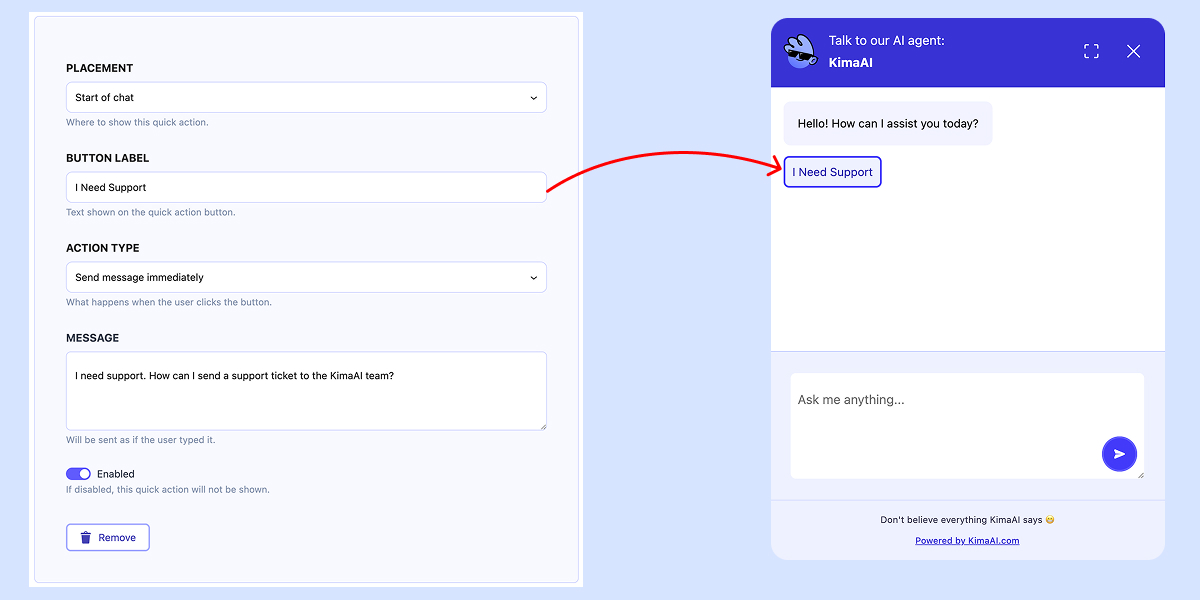
The Quick Action Expected Behavior
When the user clicks on this quick action, we expect to see the predefined message to be sent to the AI Chatbot immediately, and then the chatbot will answer based on the prompt/instructions that we set in → Chatbot Settings. As you can see in the following screenshot, after clicking on → “I Need Support” → our message → “I need support. How can I send a support ticket to the KimaAI team?” has been sent to the chatbot immediately, and we can see the chatbot’s response.

Example 4: Pre-fill input
In this example, we want to showcase the Prefill input action type. The idea of this action type is that when the user clicks on it, the chatbot input will be filled with the pre-fill text that we defined, to help the user to quickly get the answer they want.
- Placement: Start of chat
- Button Label: Track my order
- Action Type: Prefill input
- Prefill Text: The desired message to be filled in the AI Chatbot input field.
- Command Mode: None
- For this example, we set the command mode to none, to show you that you can use the Prefill input action type without a command as well.
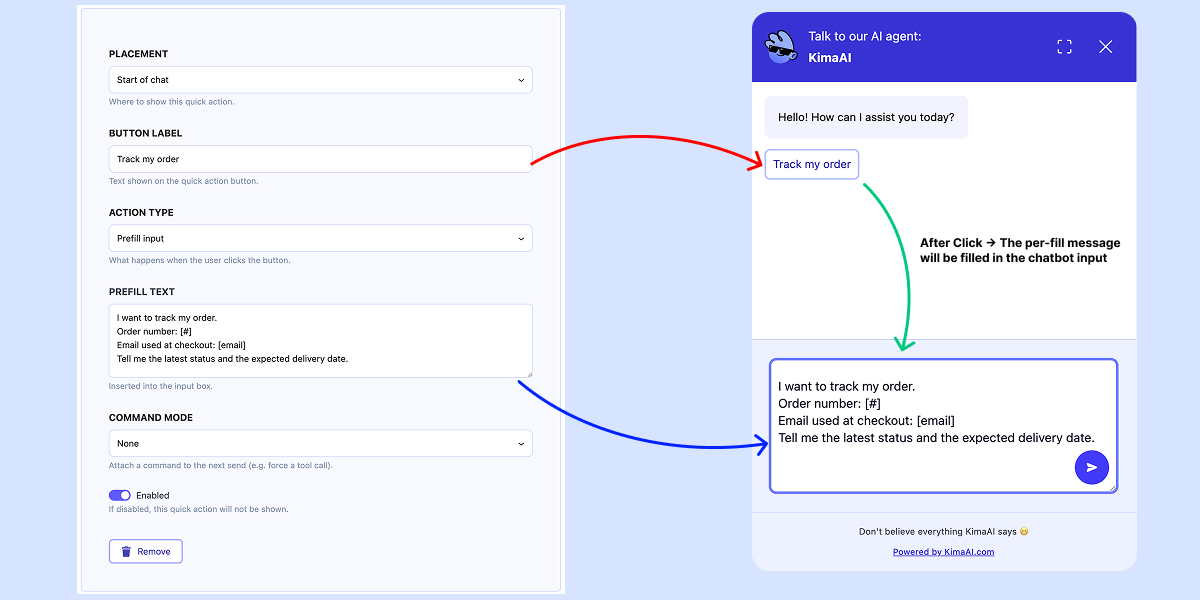
The Quick Action Expected Behavior
When the user clicks on “Track my order” quick action, the text that we defined must fill the AI Chatbot input, then the user can remove the order number and email placeholders and add their real information, and then send it to the AI Chatbot.
Example 5: Pre-fill input + Command Mode
Now, for this example, let’s extend example 4 by adding a command mode and the force tool option. There are 2 types of command mode
- Force tool
- With this option, you can force a tool
- Server callback
- With this option, you can call a callback function.

Which for this example, we will use the Force tool.
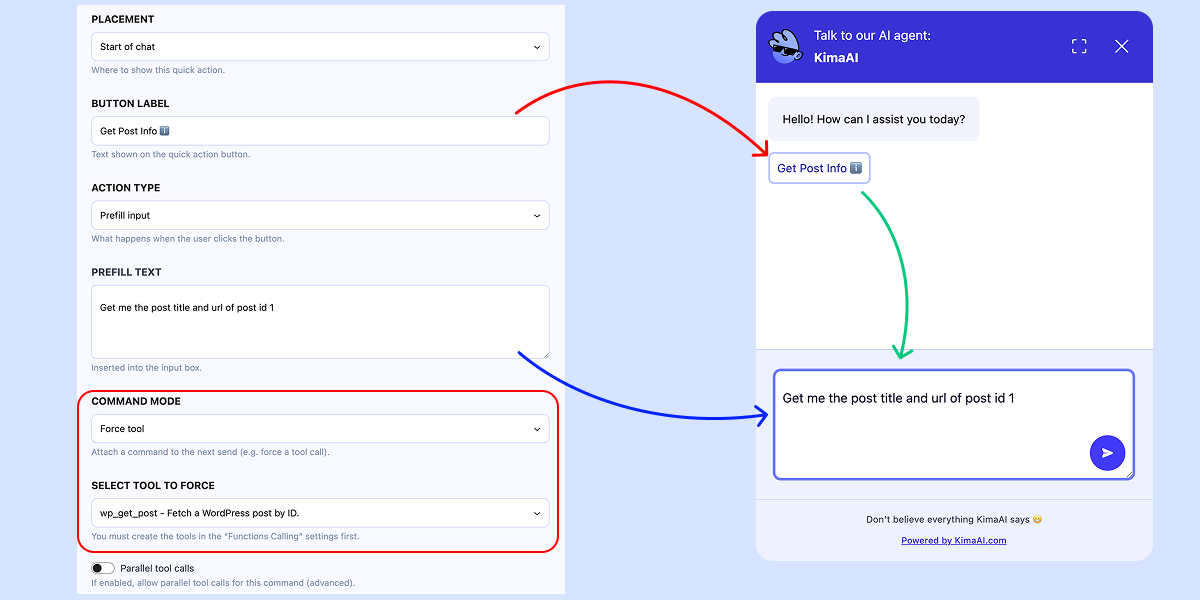
Command Mode and Select Tool To Force Options
Check the above screenshot, you can see if you change the Command Mode option to Force tool, then the Select Tool To Force will be shown.
Where are the tools coming from?
You can populate your custom tools/functions via hooks and also from the Function calling settings tab. After doing so, you can see your tools inside the KimaAI Settings Page → Chatbot → Settings → Function Tools → Allowed Custom Functions.
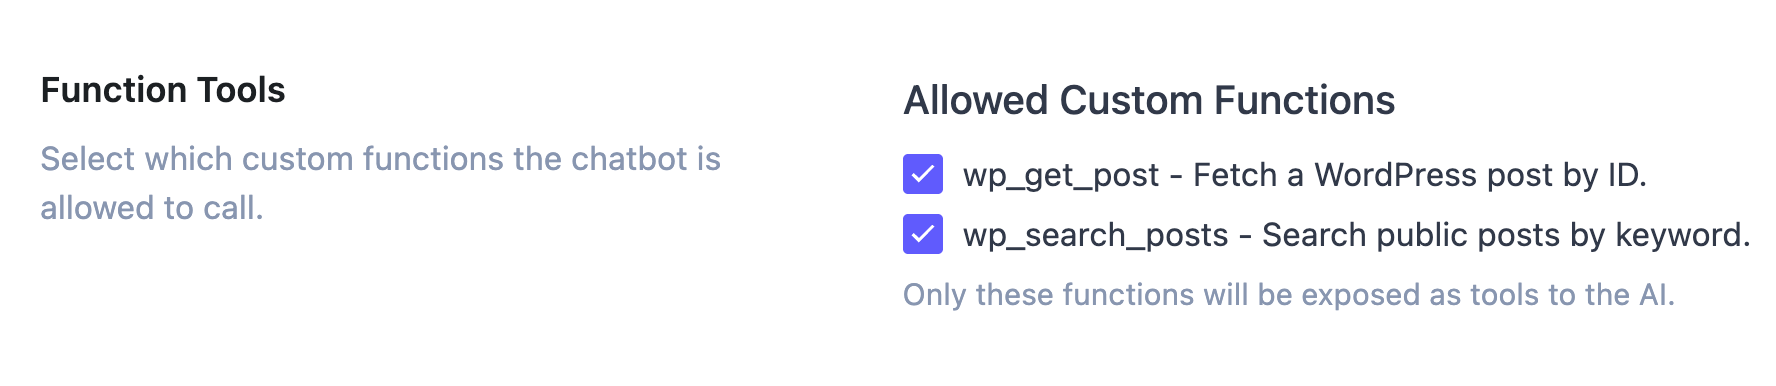
There are 2 default tools defined to allow you to test this feature and get the idea of how you should use this cool feature.
Now, for the Select Tool To Force, we choose one of the default functions, which is wp_get_post.
Now, let’s test our quick action! In the following screenshot, you can see we sent the message to the chatbot and received the correct response.
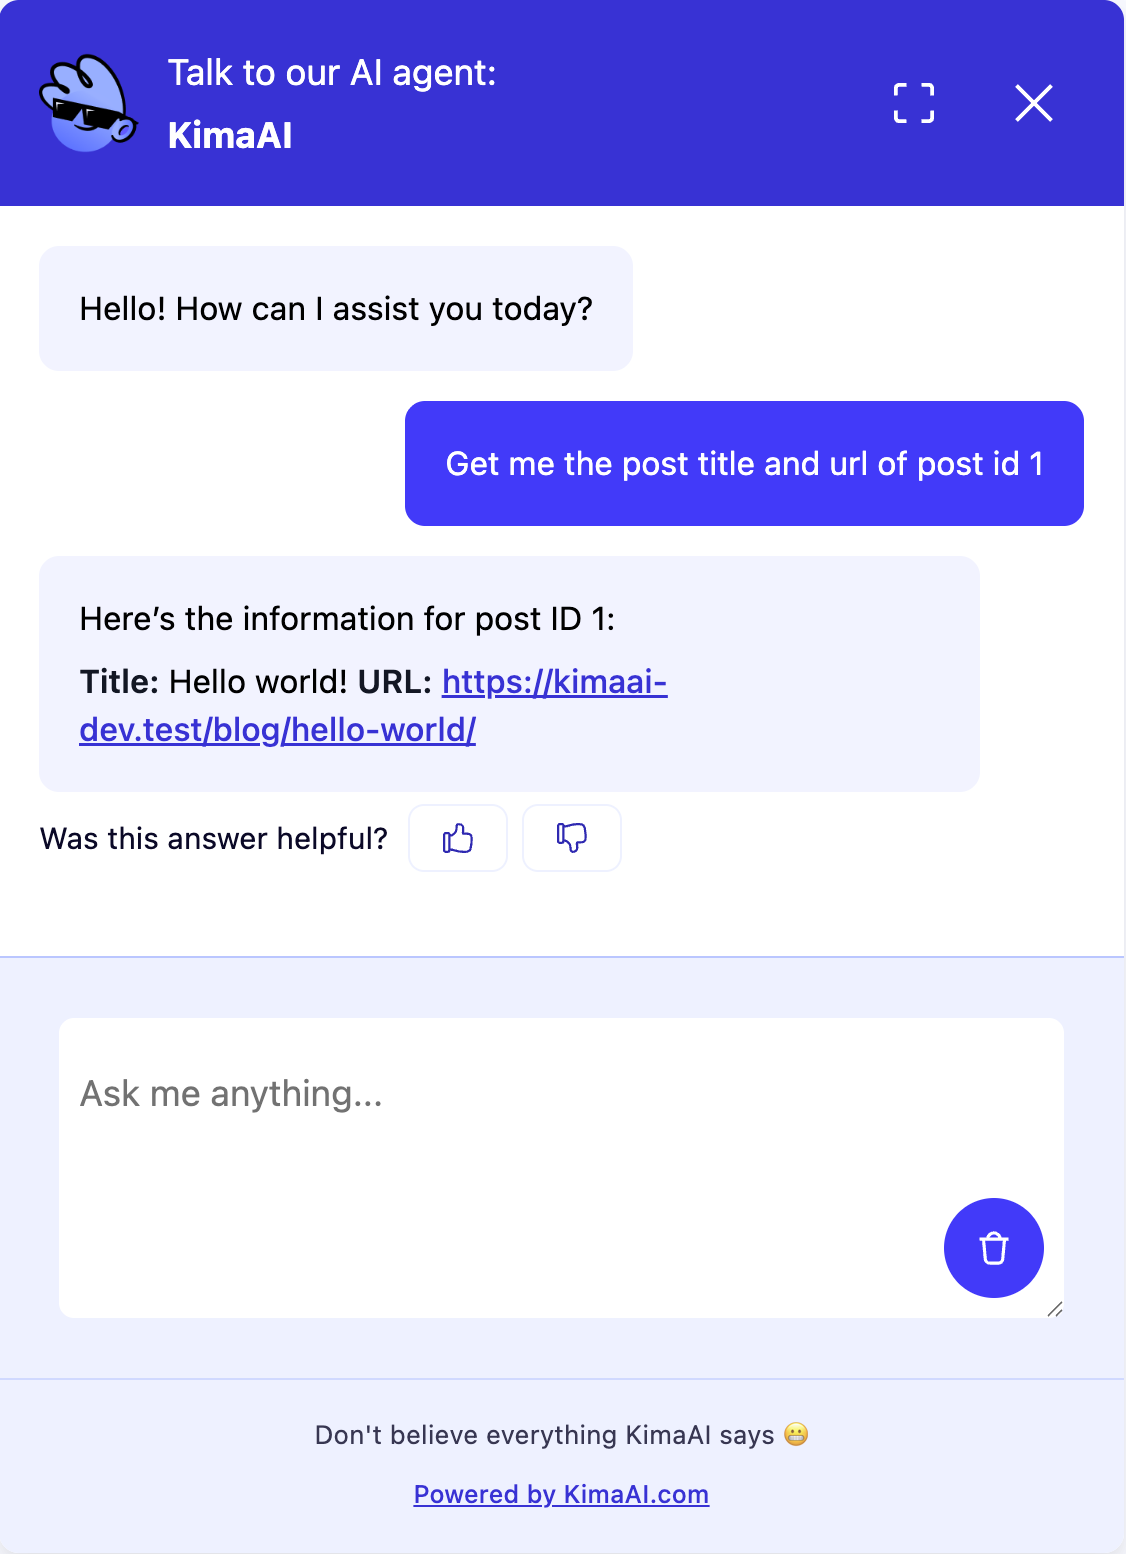
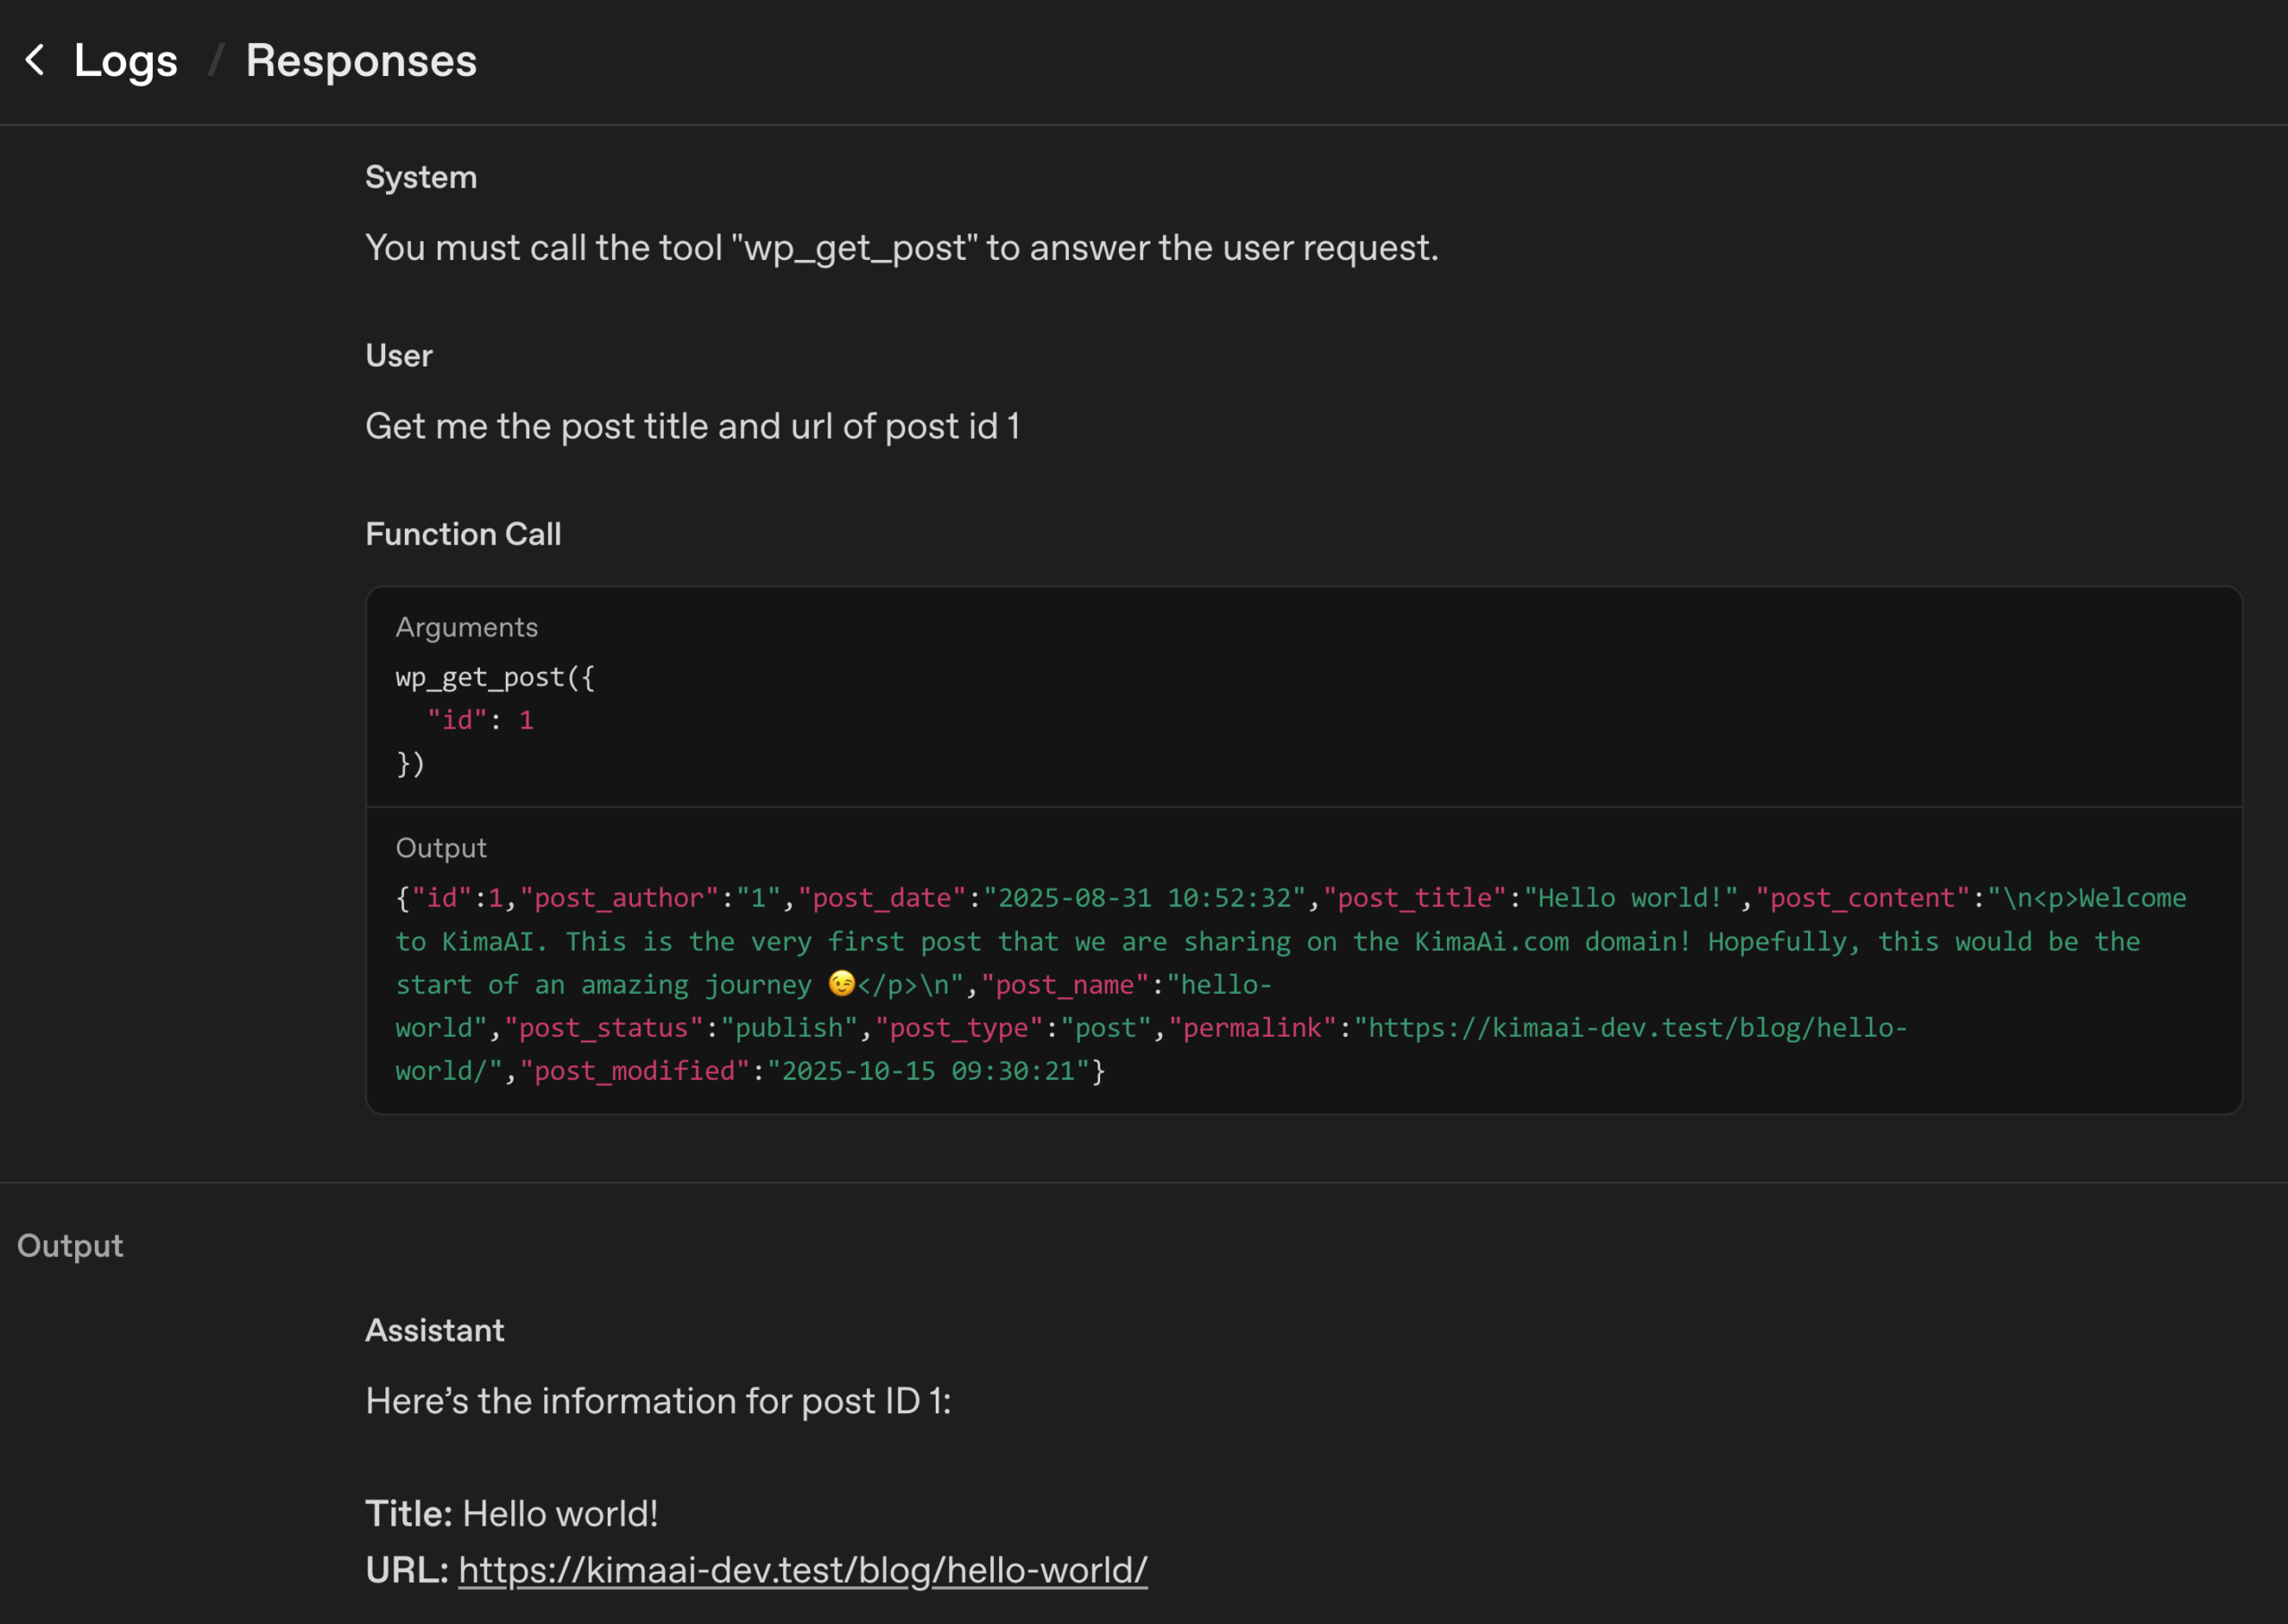
Let’s check OpenAI Logs for more details
If you go to https://platform.openai.com/logs?api=responses, you can see the API calls log, and if you check for your last API call, you can see a function call to our custom function, which retrieves the post via id and then the LLM will have access to this information, and then it can respond.
Example 6: Command Mode + Force tool
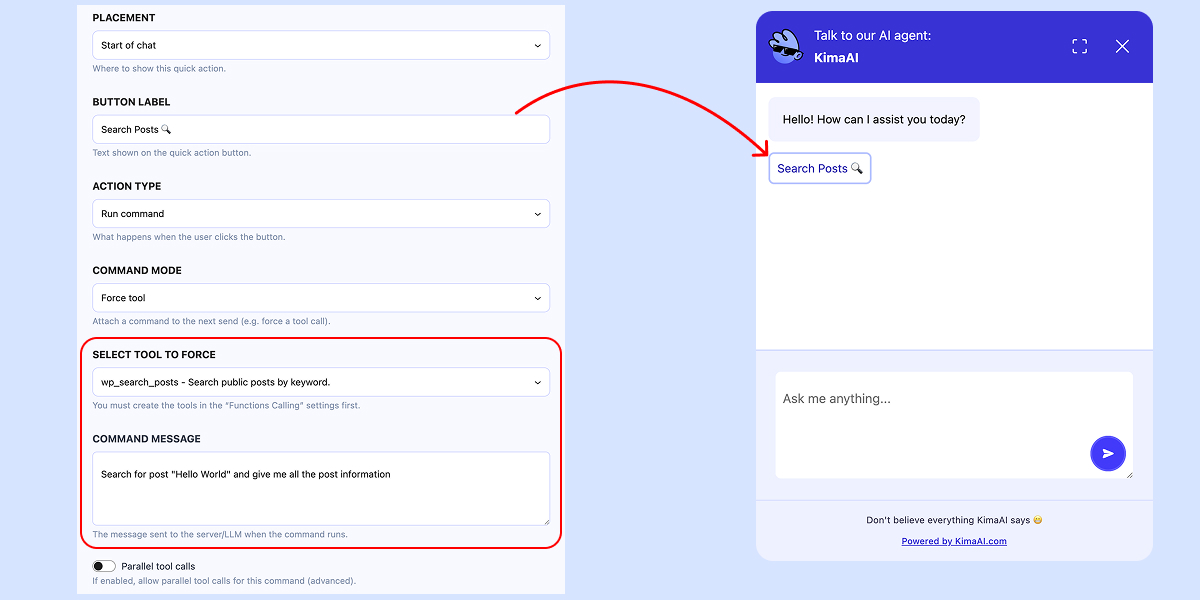
In this example, we want to create a quick action to allow users to search posts by query and receive the necessary information they need.
- Placement: Start of chat
- Button Label: Search Posts 🔍
- Action Type: Run command
- Command Mode: Force tool
- Select tool to force: wp_search_posts – Search public posts by keyword.
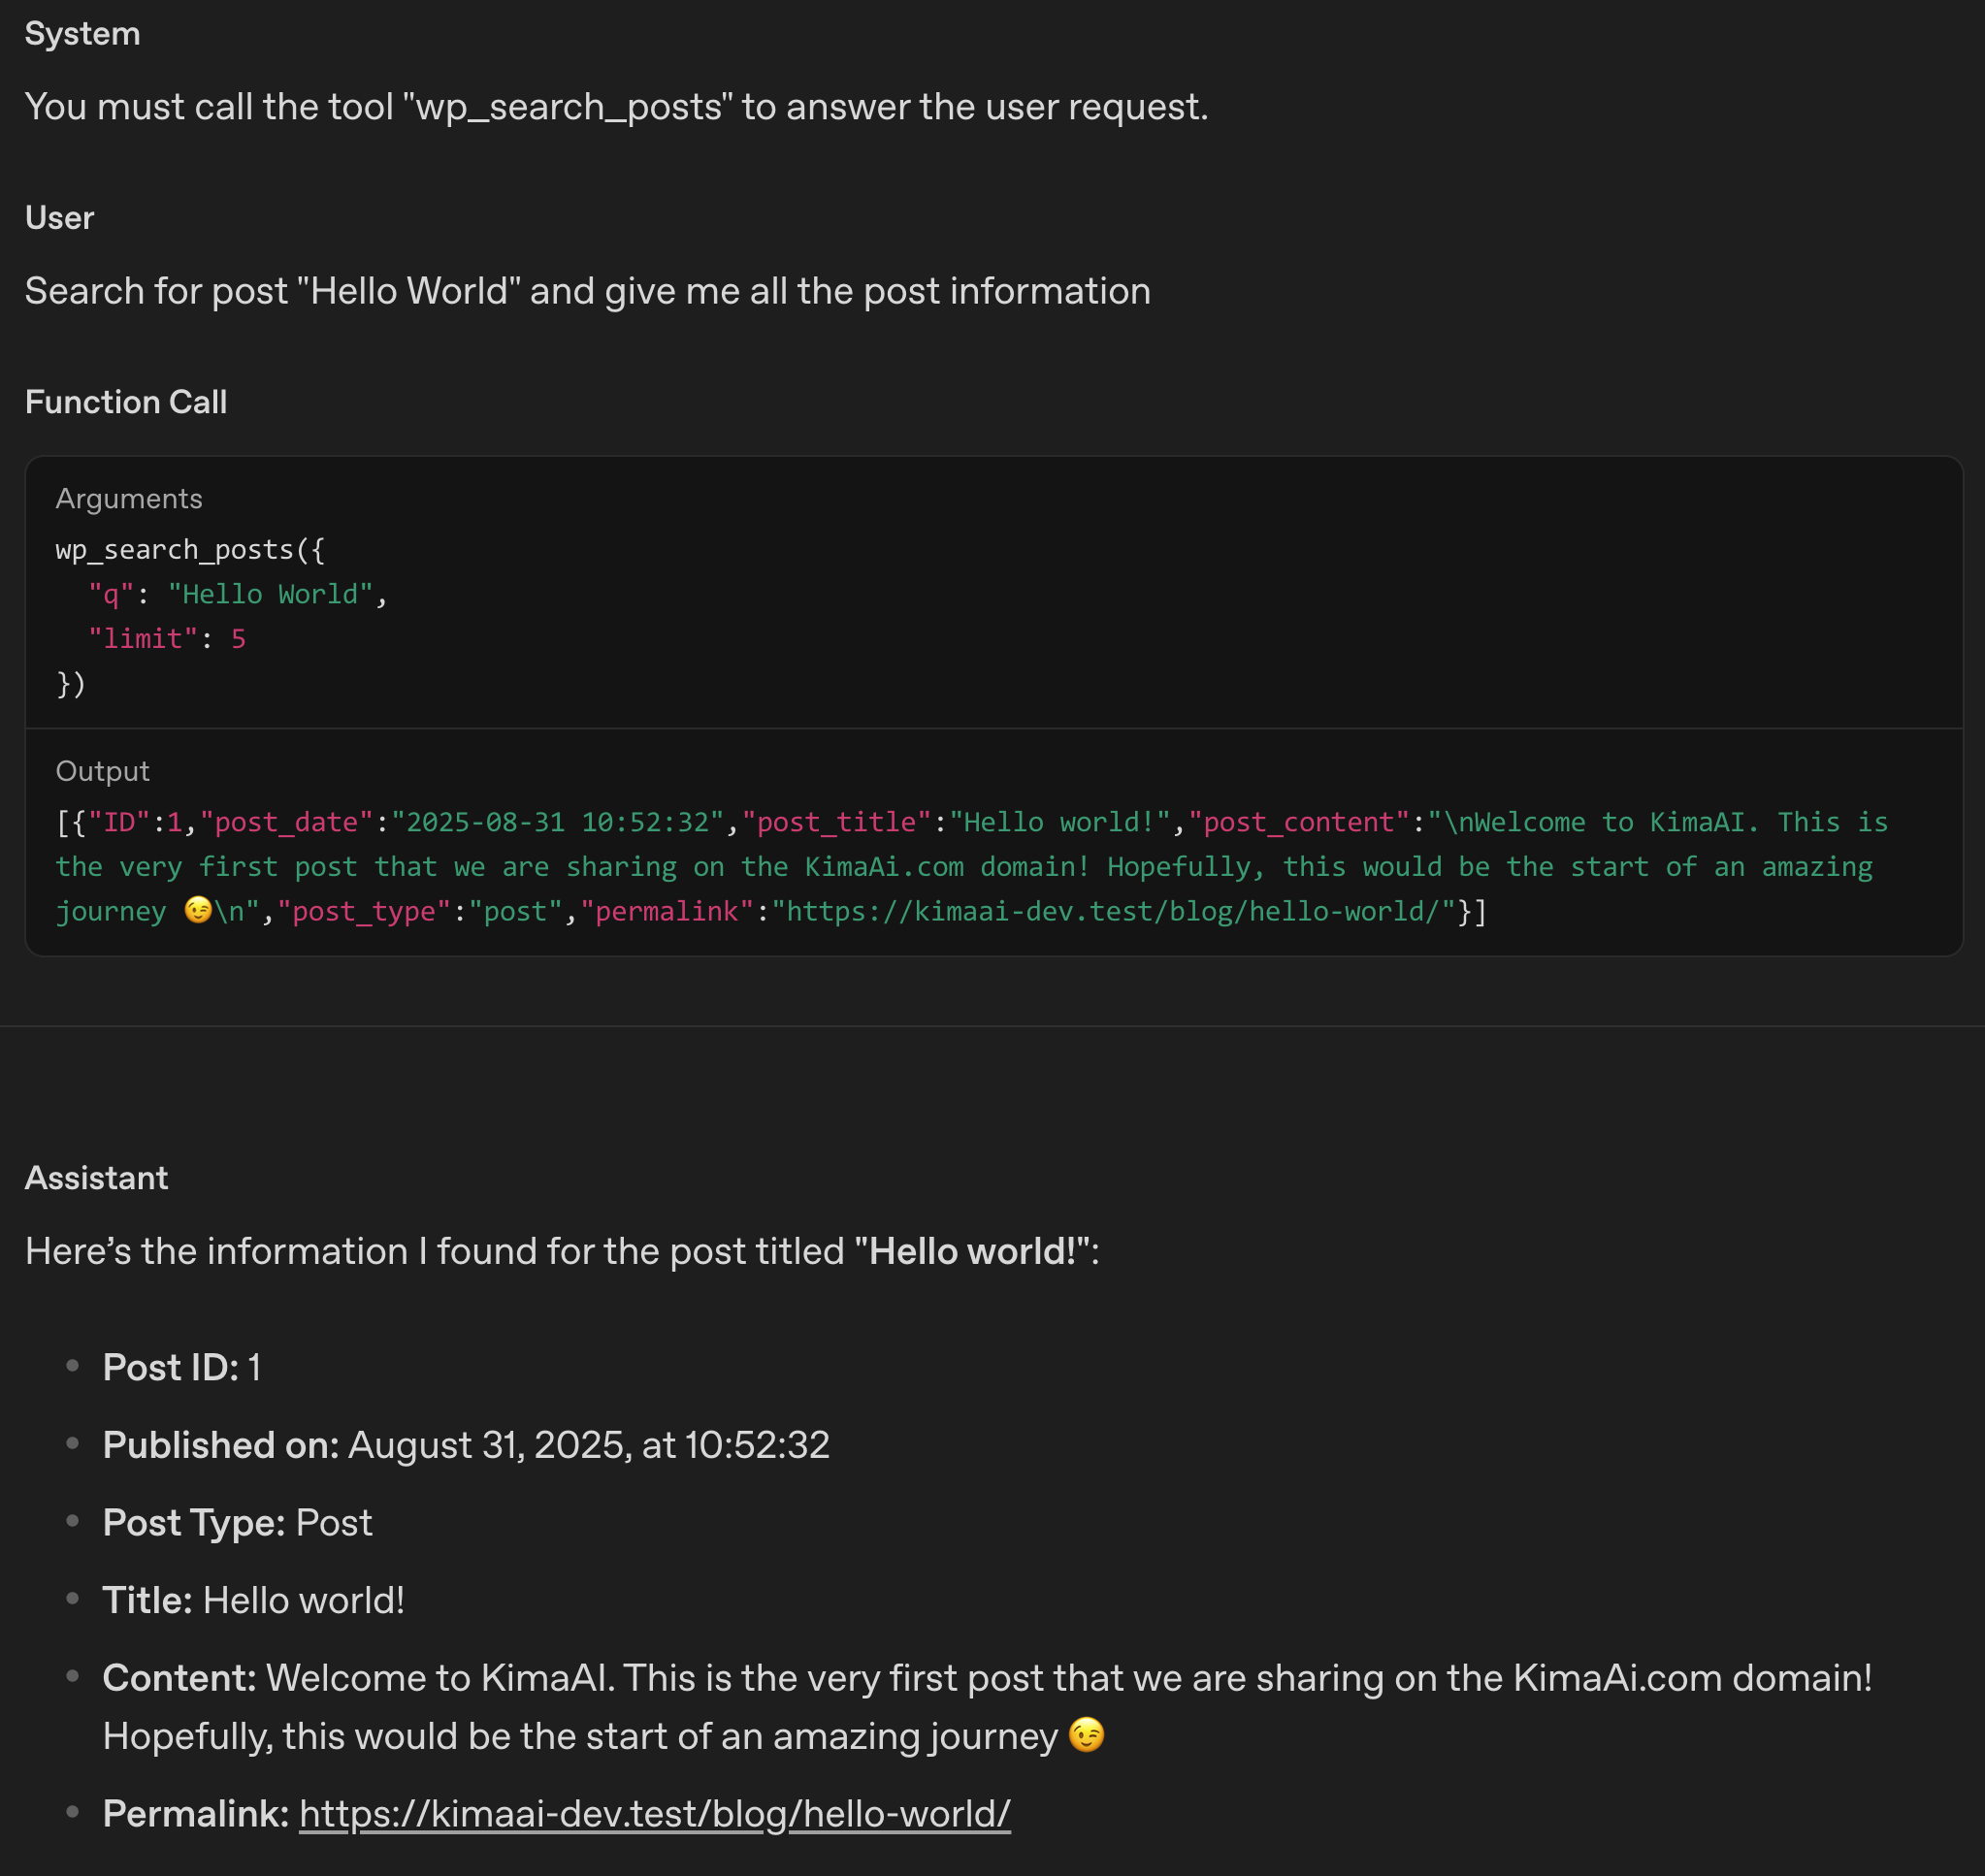
- Command message: Search for the post “Hello World” and give me all the post information
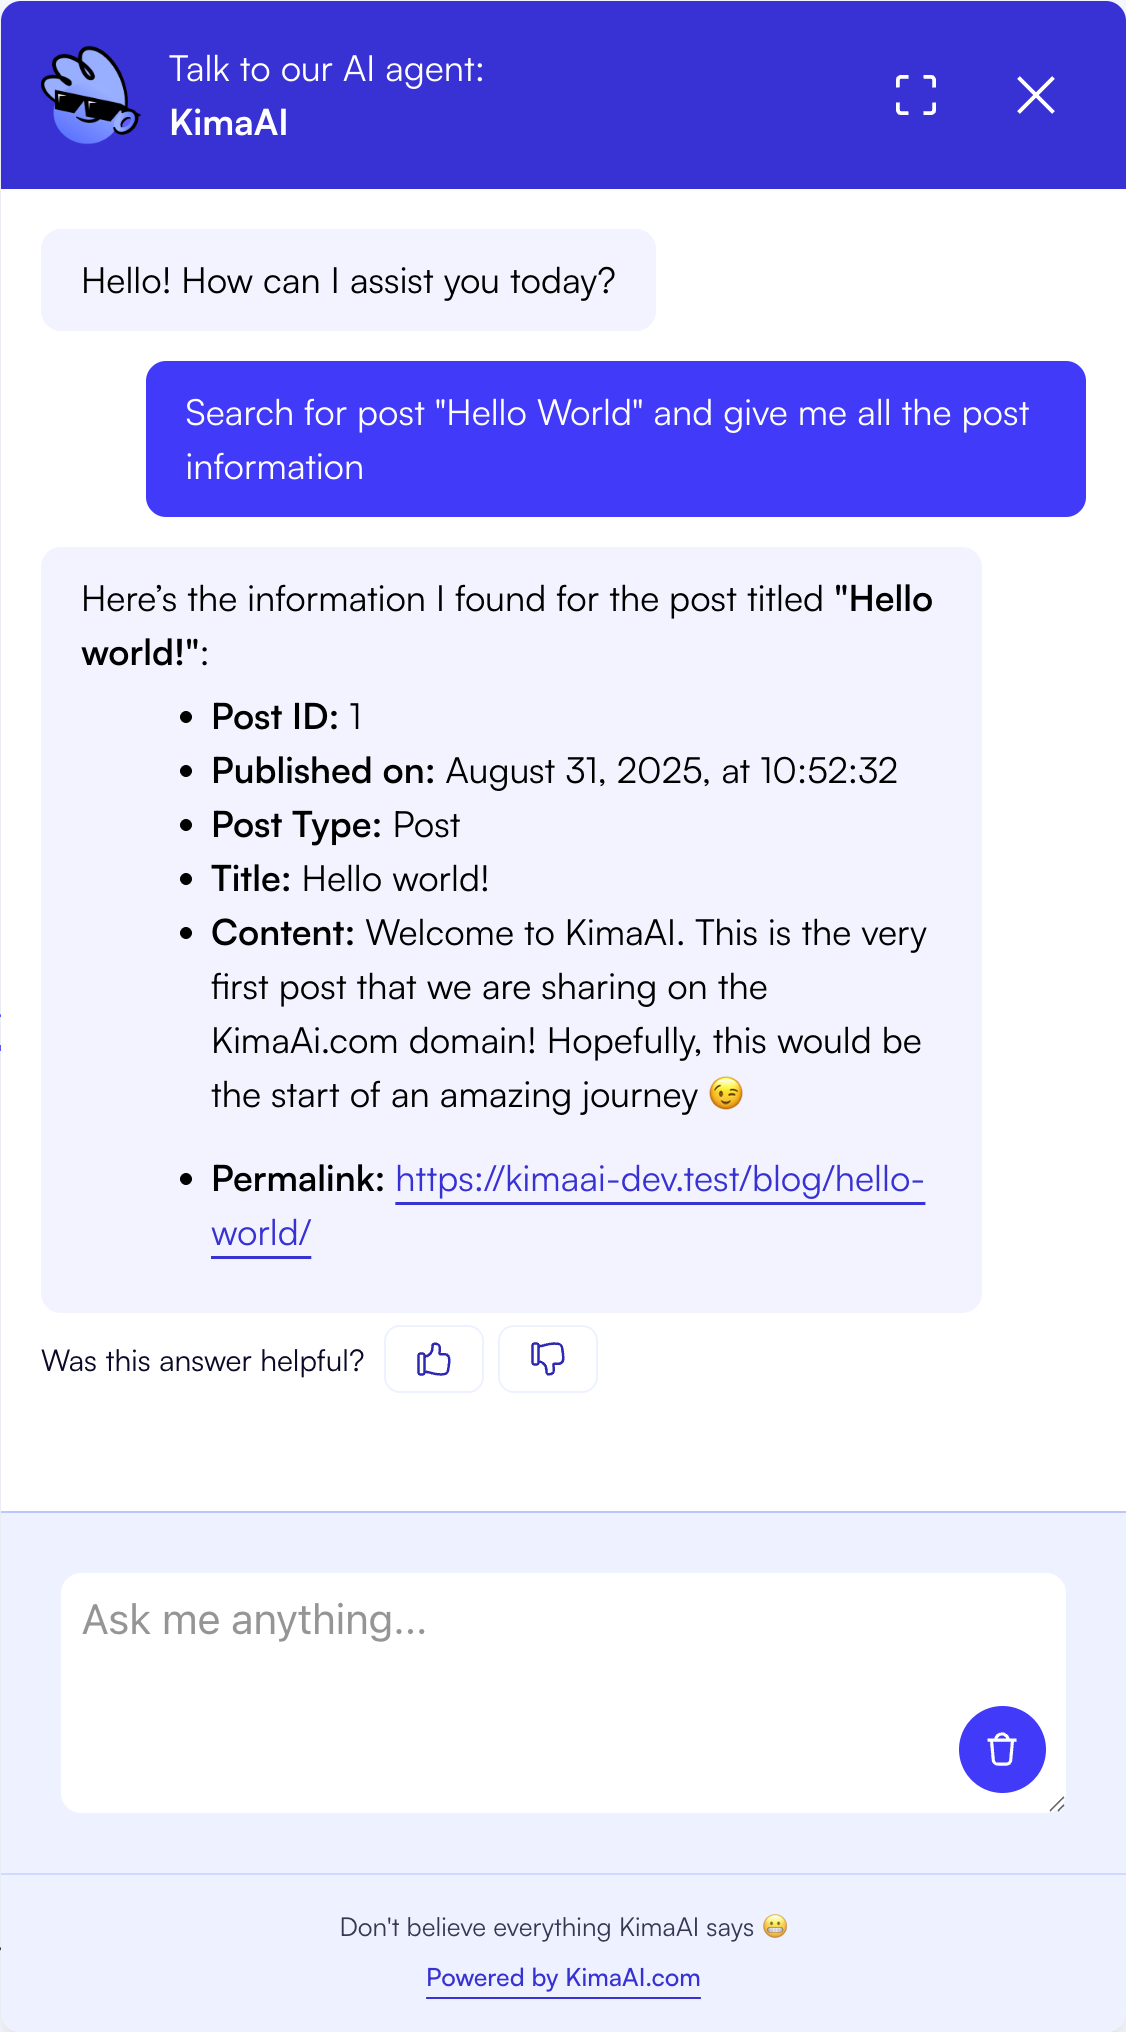
The Quick Action Expected Behavior
After the user clicks on the “Search Posts 🔍” quick action, they will see a result like the following:
And here is the OpenAI log: