Adding an AI chatbot to WordPress used to mean custom development, third-party SaaS lock-in, or a lot of trial and error. Today, there is a much easier way to launch an AI assistant on your website while keeping control of your own AI provider account and API key.
With KimaAI for WordPress, you can install the plugin, connect your own AI provider, configure your chatbot, and start assisting visitors directly from your site. KimaAI acts as the control layer between your WordPress website and external AI services, so you do not need to build the integration from scratch. KimaAI does not provide its own AI model; instead, it connects your website to providers such as OpenAI through your own API credentials.
In this guide, we will walk through how to add an AI chatbot to WordPress using your own API key, step by step.
Why use your own API key for a WordPress AI chatbot?
Using your own API key gives you more control over your chatbot setup.
Here are a few practical reasons website owners prefer this approach:
- You control the billing directly with your AI provider.
- You can choose the model and provider that fit your use case.
- You are not locked into a single hosted chatbot platform.
- You can fine-tune chatbot behavior from inside WordPress.
- You can scale or change your setup later without rebuilding everything.
KimaAI is built around this model. In the docs, we recommend setting up an external AI provider account, then creating an AI Environment inside the plugin using that provider’s API key. From there, you can configure presets and chatbot-level settings for your site.
What you need before you start
Before adding your AI chatbot to WordPress, make sure you have:
- A WordPress website with admin access.
- The KimaAI plugin is installed and activated.
- An account with your AI provider.
- A valid API key.
- A payment method configured with your AI provider if required.
The setup flow starts with plugin installation, then API key creation, and then AI Environment configuration inside the KimaAI plugin’s dashboard.
Step 1: Install and activate KimaAI on WordPress
First, install the plugin on your WordPress website.
To do that:
- Log in to your WordPress admin dashboard.
- Go to Plugins.
- Click Add Plugin.
- Search for KimaAI.
- Click Install Now.
- Click Activate.
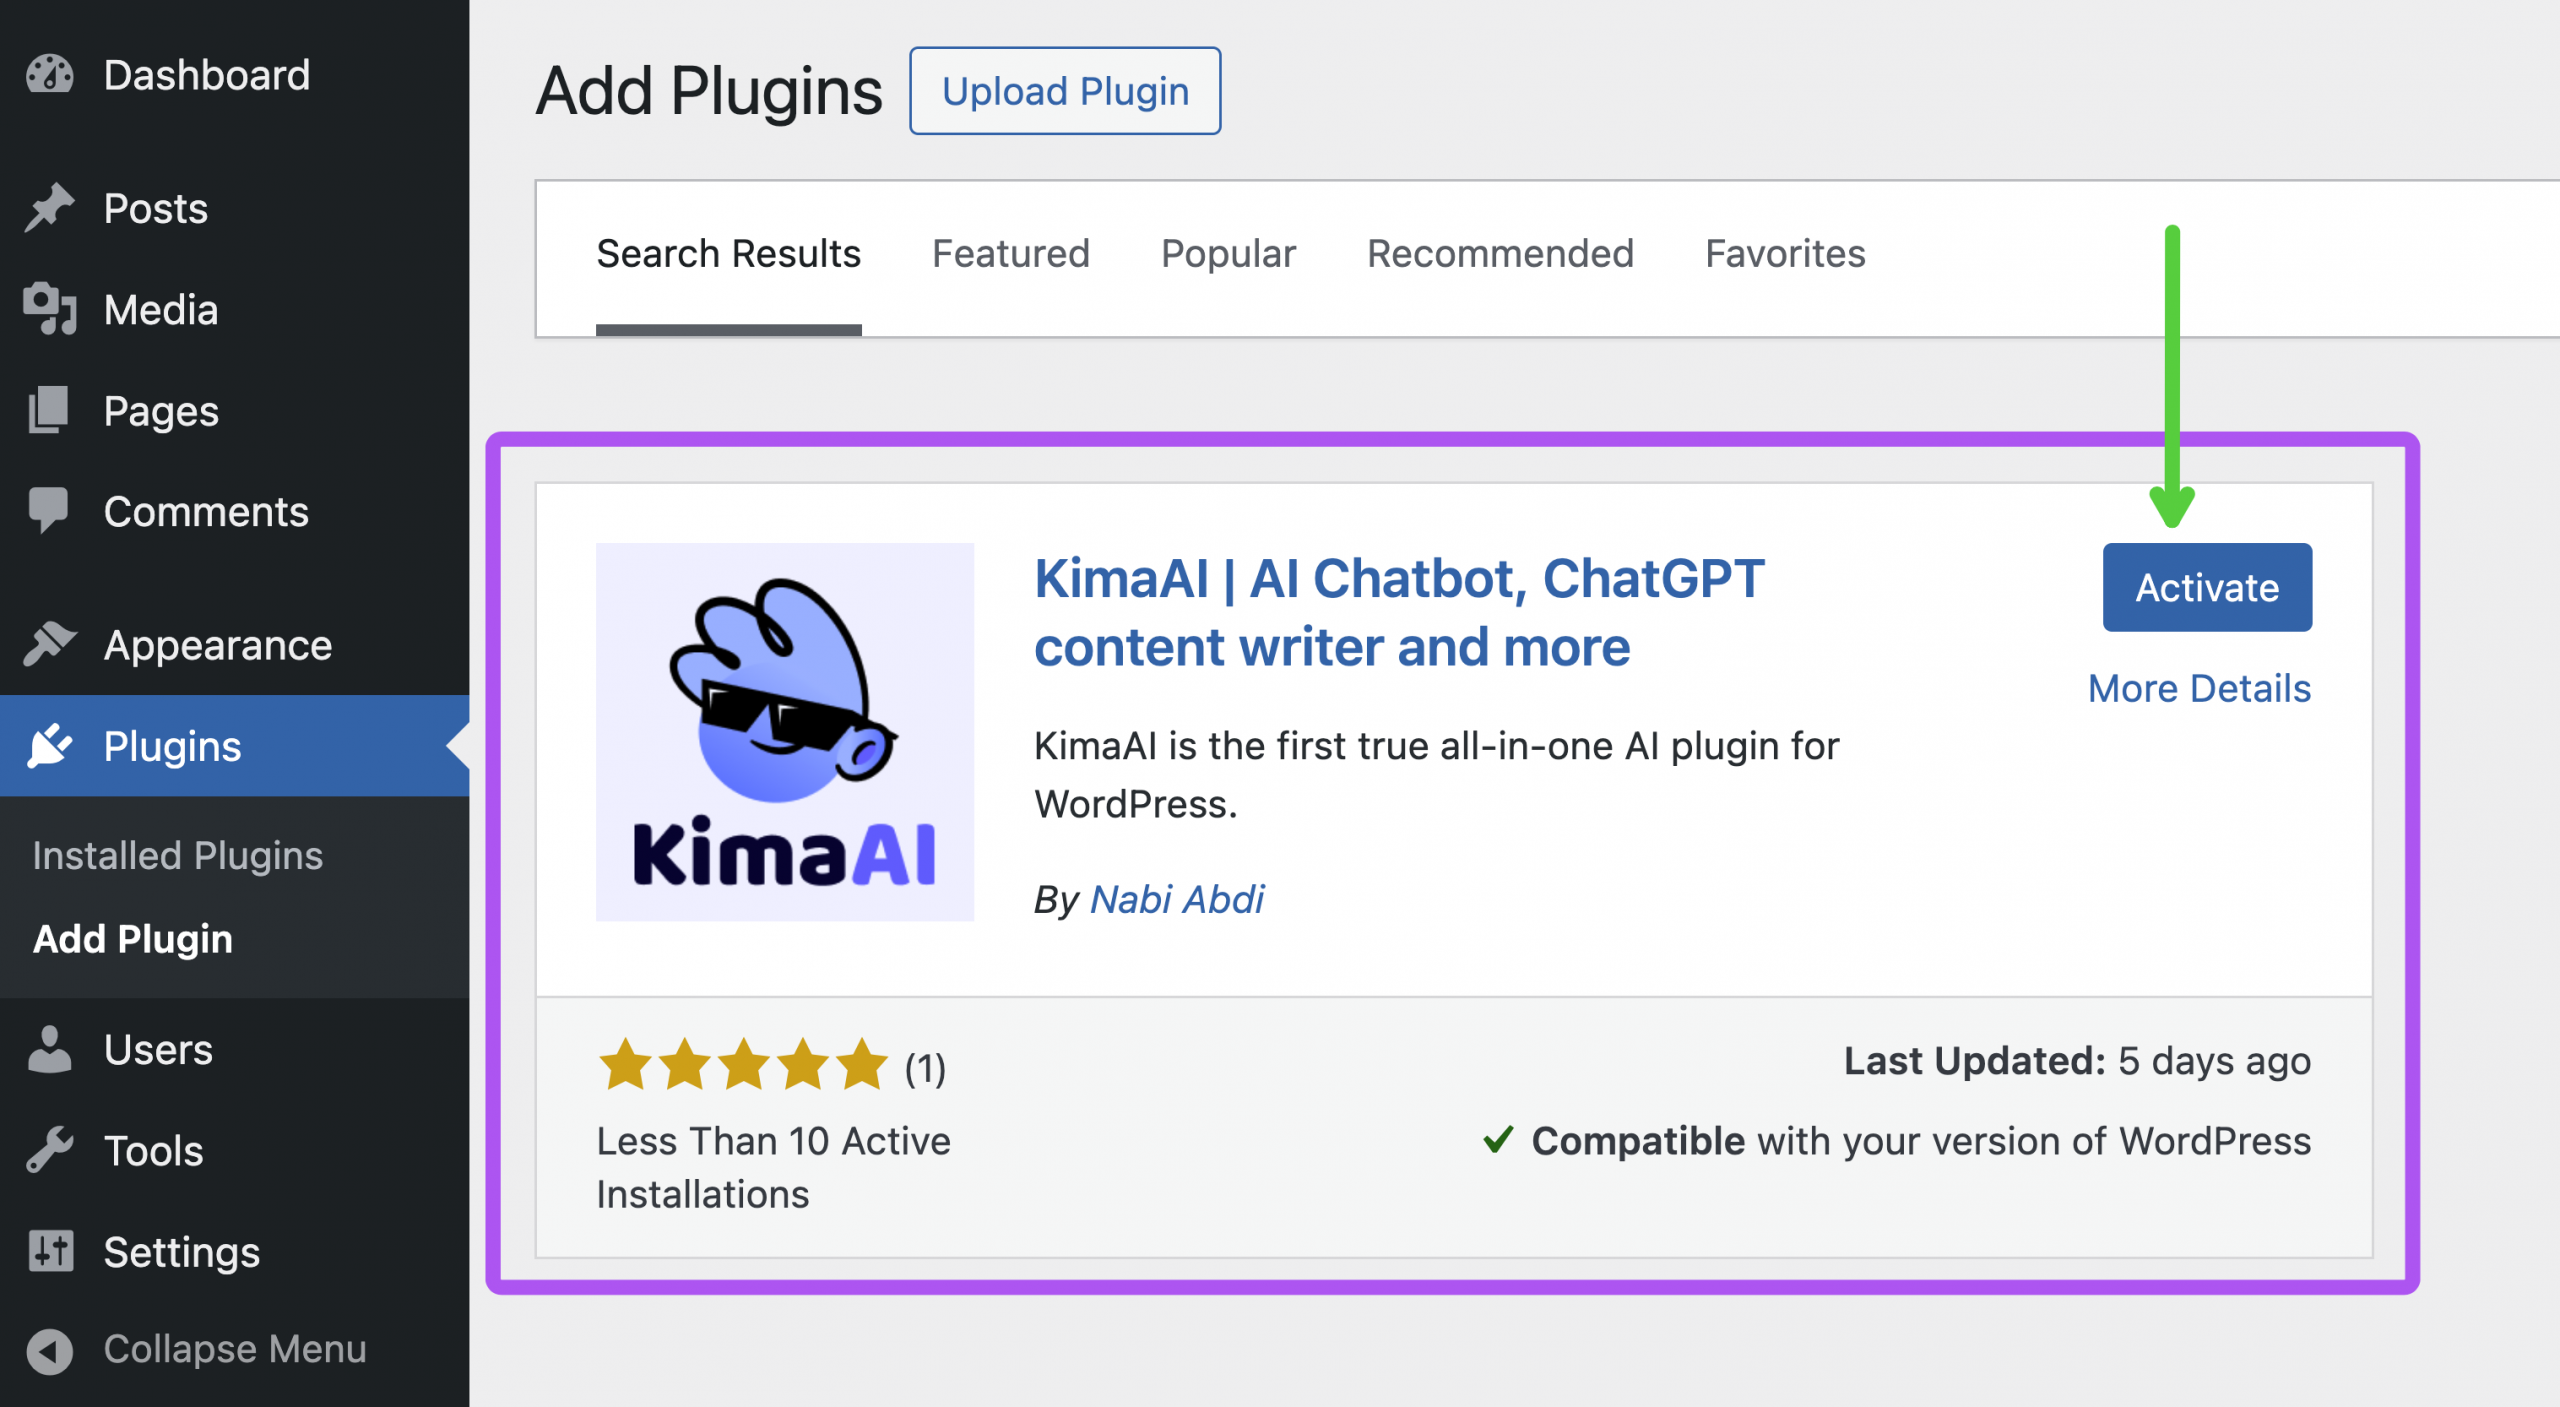
The KimaAI installation guide shows this exact flow inside WordPress, including searching for the plugin and activating it from the plugins screen.
Once activated, you will see the KimaAI menu inside your WordPress dashboard, where you can access the plugin settings and setup flow. KimaAI also includes a setup wizard to help users get started quickly.
Step 2: Create your AI provider account and API key
To use KimaAI, you need to connect to an AI service. We recommend starting with OpenAI for new users, and our documentation includes a dedicated guide for creating an OpenAI account, adding a payment method, topping up billing, and generating your first API key. → https://kimaai.com/docs/openai-api-key/
The typical process is:
- Create an account with your AI provider.
- Add a payment method.
- Set up your billing or pay-as-you-go balance.
- Create a new secret API key.
- Copy and store the key safely.
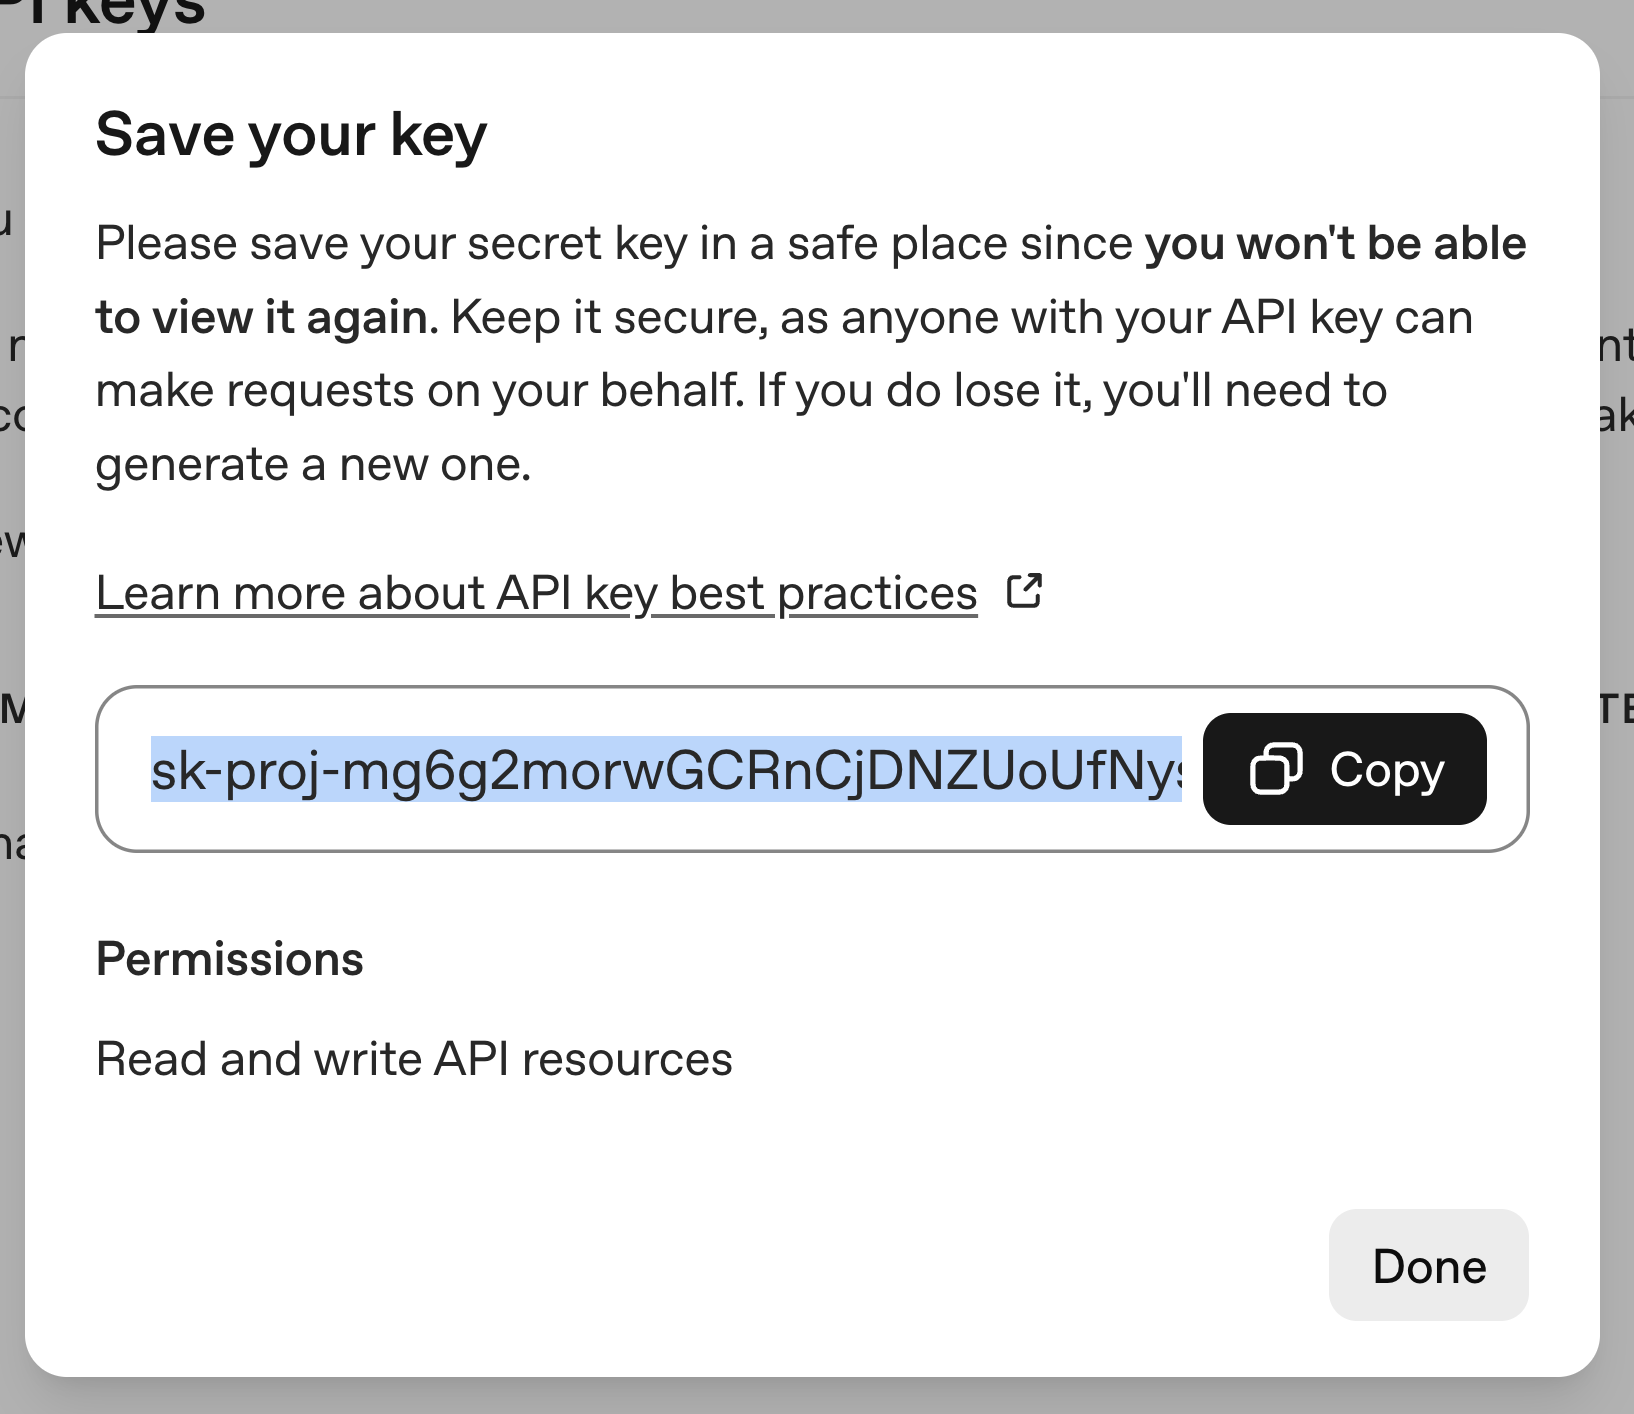
After generating an OpenAI secret key, you should copy and save it immediately because you may not be able to view it again later in the same way.
Step 3: Open the KimaAI settings in WordPress
After installation, go to the KimaAI settings area in your WordPress dashboard.
You can open the plugin from the KimaAI admin menu. If no AI Environment has been configured yet, the plugin will prompt you to create one before using the chatbot features.
This is the stage where KimaAI shifts from “plugin installed” to “AI-ready.”
Step 4: Create your first AI Environment
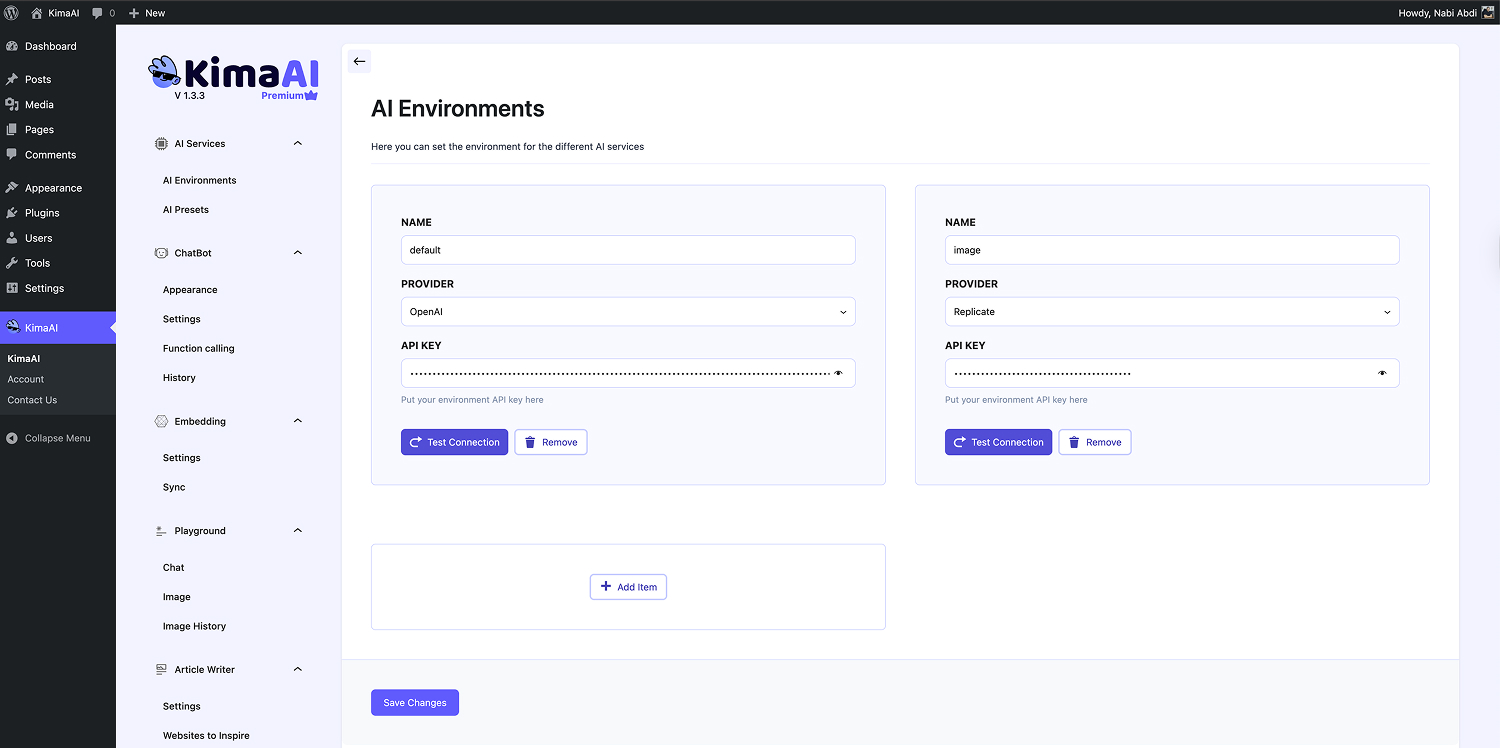
Inside AI Services, KimaAI provides an AI Environments section where you can store your AI provider credentials. You can create multiple environments, and the KimaAI plugin supports multiple providers, while recommending OpenAI as a starting point.
To create your first AI Environment:
- Go to KimaAI → AI Services.
- Open the AI Environments tab.
- Click Add Item.
- Enter a name for the environment.
- Choose your provider.
- Paste your API key.
- Click Test Connection.
- Save your changes.
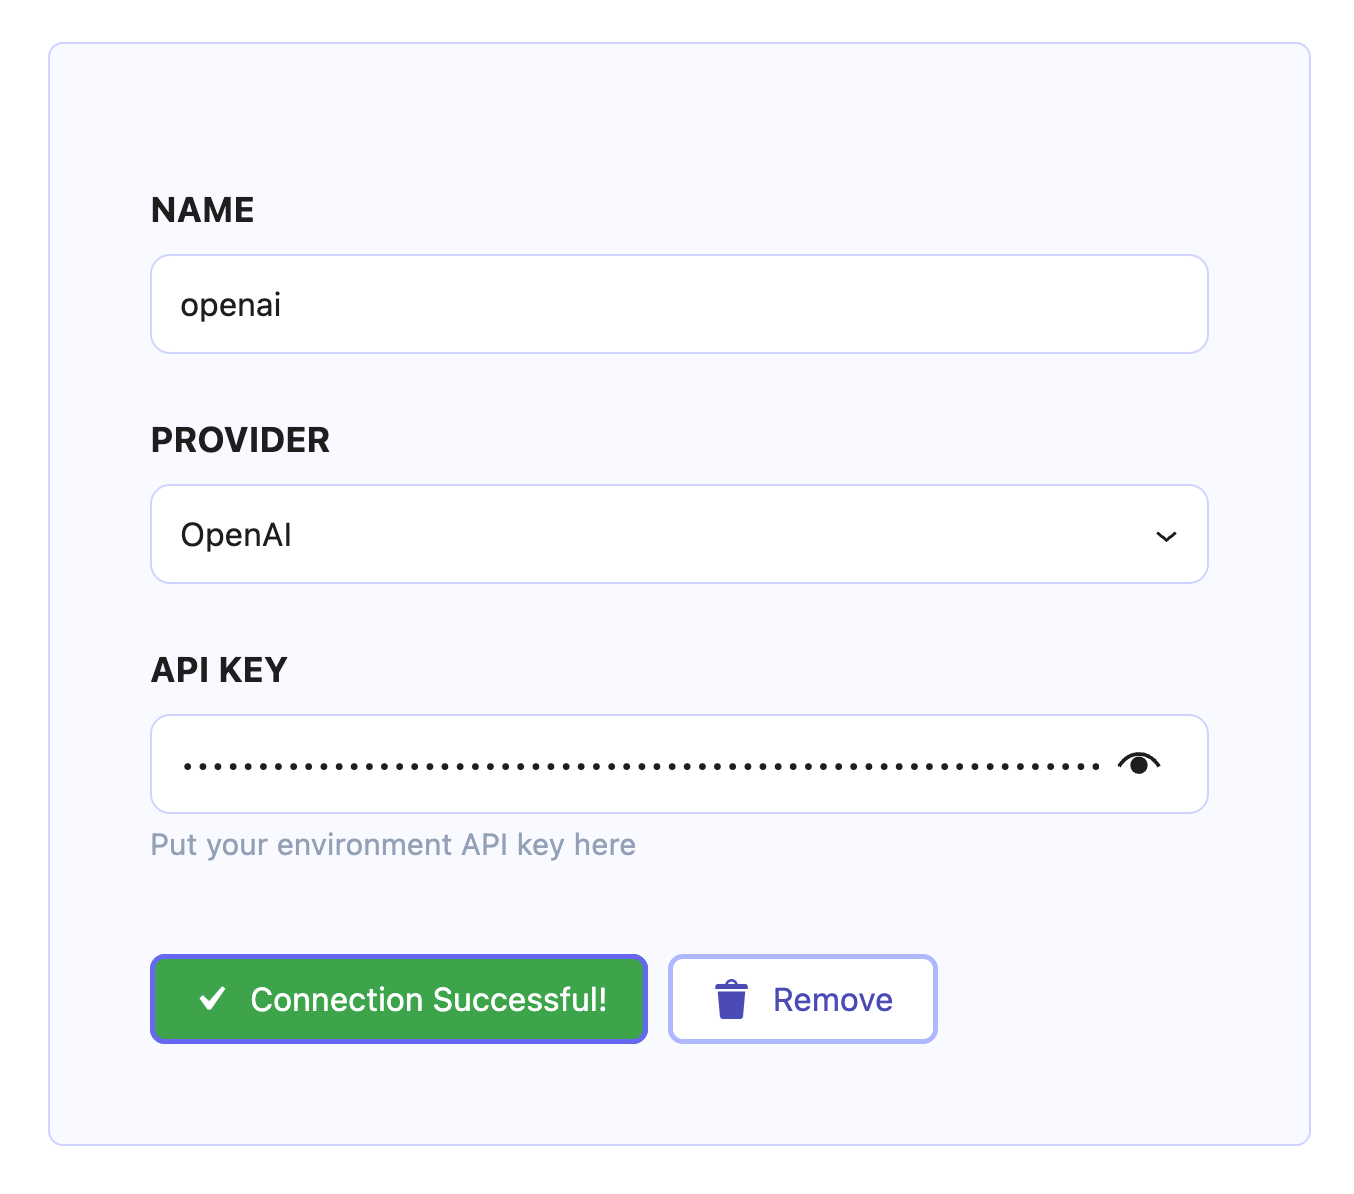
Name the environment, select the provider, paste the API key, use Test Connection, and then click Save Changes once the connection succeeds.
Step 5: Configure AI Presets for chat
After your AI Environment is connected, the next step is AI Presets.
KimaAI uses presets so that different AI features can have different default providers and models. The plugin supports separate presets such as Default Preset, AI Chat Preset, AI Image Preset, and AI Embedding Preset. For chatbot requests, the relevant one is the AI Chat Preset.
This is useful because it lets you define which provider and model should handle chat interactions across your website unless you override them elsewhere.
For a simple launch, set your AI Chat Preset first. Then, if needed, you can later override the chatbot’s provider or model inside its individual settings. Also, remember that chatbot-level settings can override the defaults selected in AI Presets.
Step 6: Set up your chatbot provider, model, and core behavior
Now open Chatbot Settings.
This is where KimaAI lets you control how the AI chatbot behaves on your website. You can configure:
- The AI provider and model
- Advanced settings such as streaming, max tokens, and max input length
- Chatbot instructions or system prompt
- Content awareness
- Function tools / tool calling
- Vector DB / knowledge base
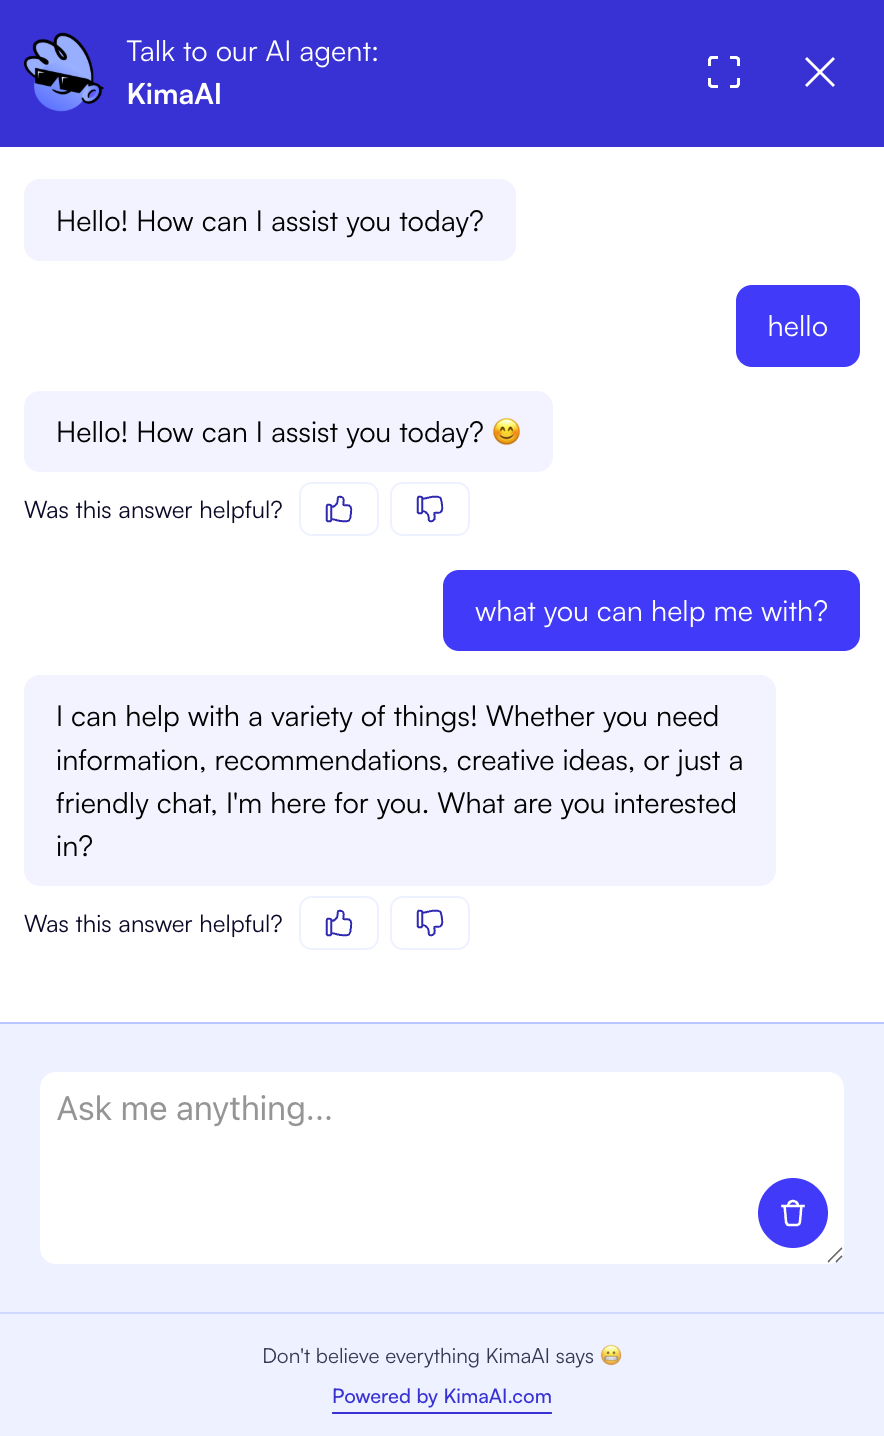
- User feedback
- Security settings
- GDPR consent
Choose the provider and model
KimaAI lets you select the provider and model directly in the chatbot settings. If you do not choose one there, the chatbot will use the defaults from AI Services → AI Presets. Remember that different models expose different configuration fields.
Add chatbot instructions
One of the most important fields is the chatbot instruction, sometimes called the system prompt. KimaAI describes this as the instruction you give the model for how it should respond to visitors.
For example, you might tell your chatbot to:
- Answer questions about your products
- Use a friendly but professional tone
- Keep answers short unless the user asks for detail
- Direct support questions to your contact page
- Avoid making claims it cannot verify
This one setting can dramatically improve answer quality. Because fine-tuning the chatbot instructions is very critical, we published a dedicated tutorial for it. You can find it here → How to Train Your AI Chatbot for Accurate Business Answers
Enable content awareness
KimaAI includes a Content Awareness option. When enabled, the chatbot can understand the current page or post the visitor is viewing, which allows users to ask questions about that specific content.
This is especially helpful for:
- Product pages
- Documentation pages
- Blog posts
- Service pages
- Knowledge centers
For content-heavy WordPress sites, this can make the chatbot feel much more relevant and helpful.
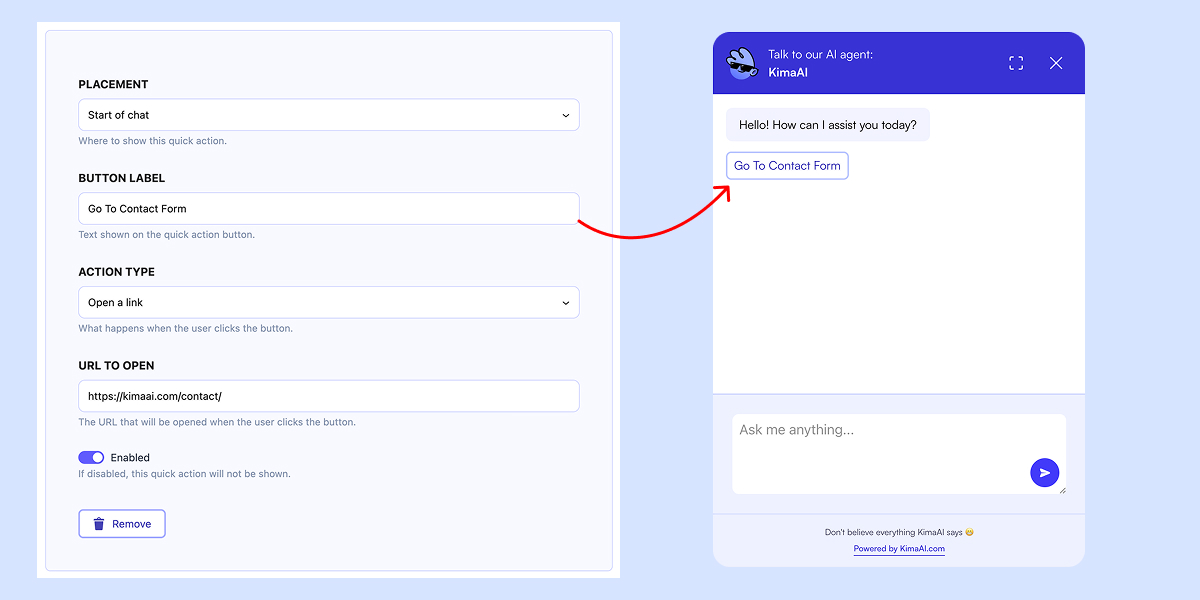
Step 7: Improve engagement with quick actions
If you want users to interact with your chatbot faster, configure Chatbot Quick Actions.
KimaAI supports multiple quick action placements and action types. Quick actions can appear at the start of the chat or after a bot message, and can perform actions such as:
- Open a link
- Send a message immediately
- Pre-fill the input
- Run a command
This is excellent for content marketing and lead generation.
For example, you could add quick actions like:
- “Show me pricing”
- “Book a demo”
- “Compare plans”
- “Track my order”
- “Talk to support”
These small UX improvements can increase engagement and help guide visitors toward conversion actions.
Step 8: Add security, feedback, and compliance settings
KimaAI also includes built-in settings to make your chatbot more manageable in real-world use.
With KimaAI Chatbot and AI Assistant plugin, you can:
- Enable message-level and session-level user feedback
- Block abusive IP addresses
- Ban forbidden words
- Require GDPR consent before a user can interact with the chatbot
These settings are valuable for production websites, especially if your site serves users in privacy-sensitive regions or high-traffic environments.
Step 9: Test the chatbot on your website
Before promoting the chatbot publicly, test it on several pages of your site.
A simple testing checklist:
- Ask questions about your homepage
- Ask product-related questions
- Test the chatbot on blog posts
- Try the quick action buttons
- Check the response tone and accuracy
- Confirm the provider and model are working as expected
- Verify content awareness on individual pages
- Review security and consent behavior
Since KimaAI uses external AI providers rather than built-in models, the final output depends heavily on your chosen provider, model, and instructions. KimaAI handles the connection and flow, while the model itself is responsible for the generated output.
Best practices for using your own API key with a WordPress AI chatbot
To get better results from your chatbot, follow these practical tips:
1. Start simple
Use the default AI chat preset first, then customize later. Presets are intended to make feature-wide configuration easier.
2. Write clear instructions
Your chatbot instruction should define tone, scope, and boundaries. This is one of the highest-impact settings in the plugin.
3. Use content awareness
If your website has valuable page-level content, content awareness can make answers more relevant.
4. Add quick actions for common intents
Use quick actions to reduce friction and move visitors toward support, sales, or conversion pages.
5. Monitor API usage
Because you are using your own API key, you should keep an eye on provider usage and cost from your provider dashboard. We recommend setting up billing intentionally from the start.
Why KimaAI is a practical way to add AI chat to WordPress
KimaAI is a strong option for WordPress users who want more control without building a custom plugin integration.
KimaAI gives you:
- A WordPress-native setup flow
- AI Environments for storing provider credentials
- AI Presets for consistent defaults
- Chatbot-specific provider and model overrides
- Prompt control through chatbot instructions
- Content awareness
- Quick actions
- Optional tool calling and knowledge base features
- Security and consent settings
That combination makes it useful not only for support use cases, but also for content marketing, lead capture, and on-site engagement.
Final thoughts
If you want to add an AI chatbot to WordPress using your own API key, the fastest path is to install KimaAI, connect your provider in AI Environments, configure your AI Chat Preset, and then fine-tune behavior inside Chatbot Settings.
This approach gives you flexibility, more direct control over billing, and a cleaner way to launch AI functionality on your own website without needing a custom integration. In the documentation, we already cover the essential flow, so please use it.
If your goal is to launch an AI assistant on WordPress while keeping ownership of your provider account and setup, this is a solid way to do it.
FAQ
Can I add an AI chatbot to WordPress without coding?
Yes. KimaAI is designed as a WordPress plugin that lets you connect external AI services and configure chatbot behavior from the WordPress dashboard rather than building the integration manually.
Do I need my own API key to use KimaAI?
Yes. KimaAI works by connecting to external AI providers. In documentation, we walk you through creating an OpenAI account and API key, then adding that key inside the plugin’s AI Environment settings.
Where do I add the API key in KimaAI?
You add it in AI Services → AI Environments, where you create an environment, choose the provider, paste the API key, test the connection, and save the settings.
Can I choose different AI models for my chatbot?
Yes. KimaAI lets you set defaults in AI Presets and also select provider and model directly in Chatbot Settings. The plugin docs note that chatbot-level settings can override preset defaults.
Can the chatbot answer questions about the current page?
Yes. KimaAI includes Content Awareness, which allows the chatbot to understand the current page or post when the feature is enabled.